In this blog post, we will go over how to use a Docker Compose file to deploy and configure Wyoming Whisper. Wyoming Whisper is an open-source, lightweight voice assistant designed to run on a Raspberry Pi or other low-powered device. The impetus for this compose defined container is to intergate with a Home Assistant 2023.5 container and ultimate have a fully local voice assistant. Whisper will provide our speech-to-text service and the Wyoming protocol is how it will be integrated with Home Assistant.
NOTE: For your reference, I am using Home Assistant in a container which is why I have not simply setup the wyoming wishper addons.
Prerequisites
Before we get started, make sure you have Docker and Docker Compose installed on your system. If you need help with installation, please refer to the official Docker documentation.
Step 1: Create a Docker Compose File
Create a file called docker-compose.yml in a directory of your choosing and add the following content to it:
version: '3'
services:
  wyoming-whisper:
    image: rhasspy/wyoming-whisper
    ports:
      - "10300:10300"
    volumes:
      - ./whisper-data:/data
    command: [ "--model", "medium-int8", "--language", "en" ]
    restart: unless-stopped
This file defines a single service named wyoming-whisper. Let’s go over what each line does:
version: '3': specifies the version of Docker Compose file format being used.image: rhasspy/wyoming-whisper: specifies the Docker image to use for the service. In this case, we are using therhasspy/wyoming-whisperimage.ports: - "10300:10300": specifies the port mapping between the container and host. The10300:10300mapping means that the container’s port10300is mapped to the host’s port10300.volumes: - ./whisper-data:/data: specifies the volume mapping between the container and host. The./whisper-data:/datamapping means that the./whisper-datadirectory on the host is mapped to the/datadirectory in the container.command: [ "--model", "medium-int8", "--language", "en" ]: specifies the command to run when the container starts. In this case, we are running Wyoming Whisper with themedium-int8model and English language.restart: unless-stopped: specifies the restart policy for the container. In this case, the container will automatically restart unless it is explicitly stopped by the user.
Whispher models
You might be trying to run this container on a lightweight device such as a Raspberry Pi, in which case it would be wise to sellect a lightweight model for improved performance. Here are the model options, sorted from least to most accurate (fastest to slowest):
- tiny-int8 (43 MB)
- tiny (152 MB)
- base-int8 (80 MB)
- base (291 MB)
- small-int8 (255 MB)
- small (968 MB)
- medium-int8 (786 MB)
- medium (3.1 GB)
The model file is downloaded on first run of the container.
Step 2: Start the Container
To start the container, navigate to the directory where your docker-compose.yml file is located and run the following command:
docker-compose up -d
The -d flag runs the container in the background.
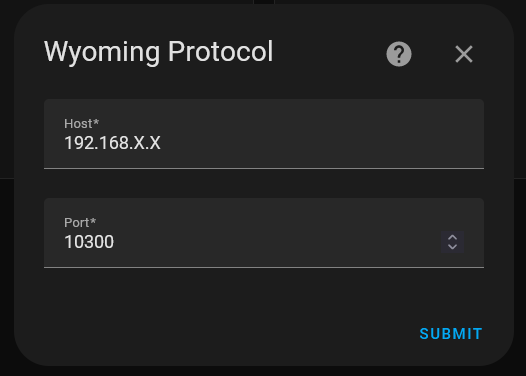
Step 3: Integrate Wyoming Whisper with Home Assistant
Now that the server is up and running we can add a new integration in our Home Assistant settings. This can be done under: Settings > Devices & Services > Add Integration.
Conclusion
That’s it! You now know how to use a Docker Compose file to deploy and configure Wyoming Whisper. Docker Compose is a powerful tool that simplifies the deployment and management of complex applications. If you are looking to prepare your HA install for a fully local voice assistant and you need to setup HTTPS, consider reading the previous post - linked below - on how this can be done with Tailscale MagicDNS and HTTPS certificates.