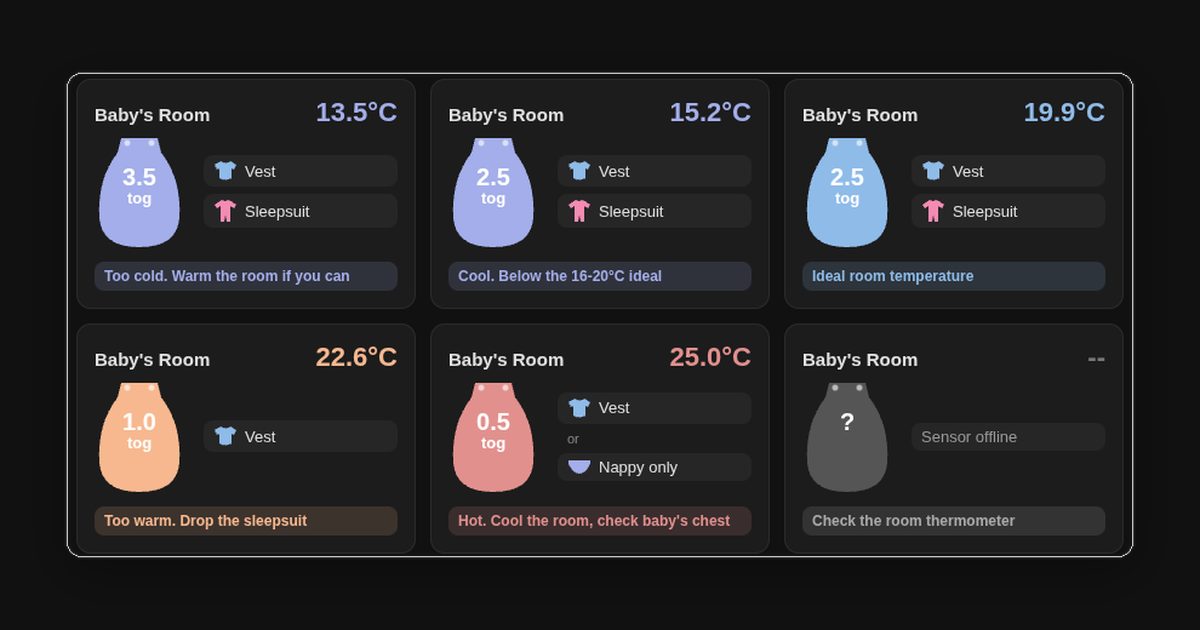
With a baby in the house, the question at bedtime is always the same: which sleeping bag, and what goes under it? The usual answer is a room thermometer and a tog chart, which means reading one, then looking up the other, often in the dark. Home Assistant already had a temperature sensor in every room, so I got it to do the lookup.
The result is one card per room. It shows the temperature, a sleeping bag in the band’s colour with its tog on it, the clothes to put underneath, and a status line saying whether the room is in the safe range. It’s a single button-card template, so the temperature bands are defined once and every room uses them.
Note: This is a lookup table on a dashboard, not medical advice. The Lullaby Trust says their room temperature advice “is intended as a guide only” and you should still check your baby by feeling their chest or the back of their neck. Hands and feet are usually cooler, which is normal.
The guidance the bands are built from
Two sources, and they cover different things.
The NHS and the Lullaby Trust both give 16-20°C as the ideal room temperature. The Lullaby Trust pairs that with “light bedding or a lightweight, well-fitting baby sleep bag”. Both say no hats indoors, and the Lullaby Trust says to take a layer off if baby’s skin is hot or sweaty. Neither gives a tog-per-temperature table. The Lullaby Trust explains why: the heat trapped between layers changes how warm the whole outfit is.
They also admit families “often look to us for a chart”, and so did we. The tog and clothing bands come from Nuby’s baby sleep temperature chart. Here they are as the card applies them:
| Room temp | Sleeping bag | Under the bag | Status |
|---|---|---|---|
| 14°C or below | 3.5 tog | Vest + sleepsuit | Too cold |
| 14-16°C | 2.5 tog | Vest + sleepsuit | Cool |
| 16-20°C | 2.5 tog | Vest + sleepsuit | Ideal |
| 20-22°C | 1.0 tog | Vest + sleepsuit | Warm |
| 22-24°C | 1.0 tog | Vest | Too warm |
| 24°C+ | 0.5 tog | Vest, or nappy only | Hot |
Two decisions the chart didn’t make for me:
- The chart skips 21-22°C. It jumps from “20-21°C” to “22-23°C”. I stretched the 20-21°C band (1.0 tog + sleepsuit) to cover it, so the sleepsuit only comes off at 22°C. Move that line if you’d rather drop it sooner.
- Boundaries need a direction. Both “16-20” and “20-21” include 20. In the code each band runs up to but not including its upper number, so exactly 20.0°C falls in the warm band.
The card also rounds the reading to one decimal place before picking a band. Without that, a sensor reporting 19.96 would show “20.0°C” next to “Ideal room temperature”, which is exactly the kind of mismatch you don’t want to puzzle over at 3am.
Picking a design
I mocked up three styles before building anything:
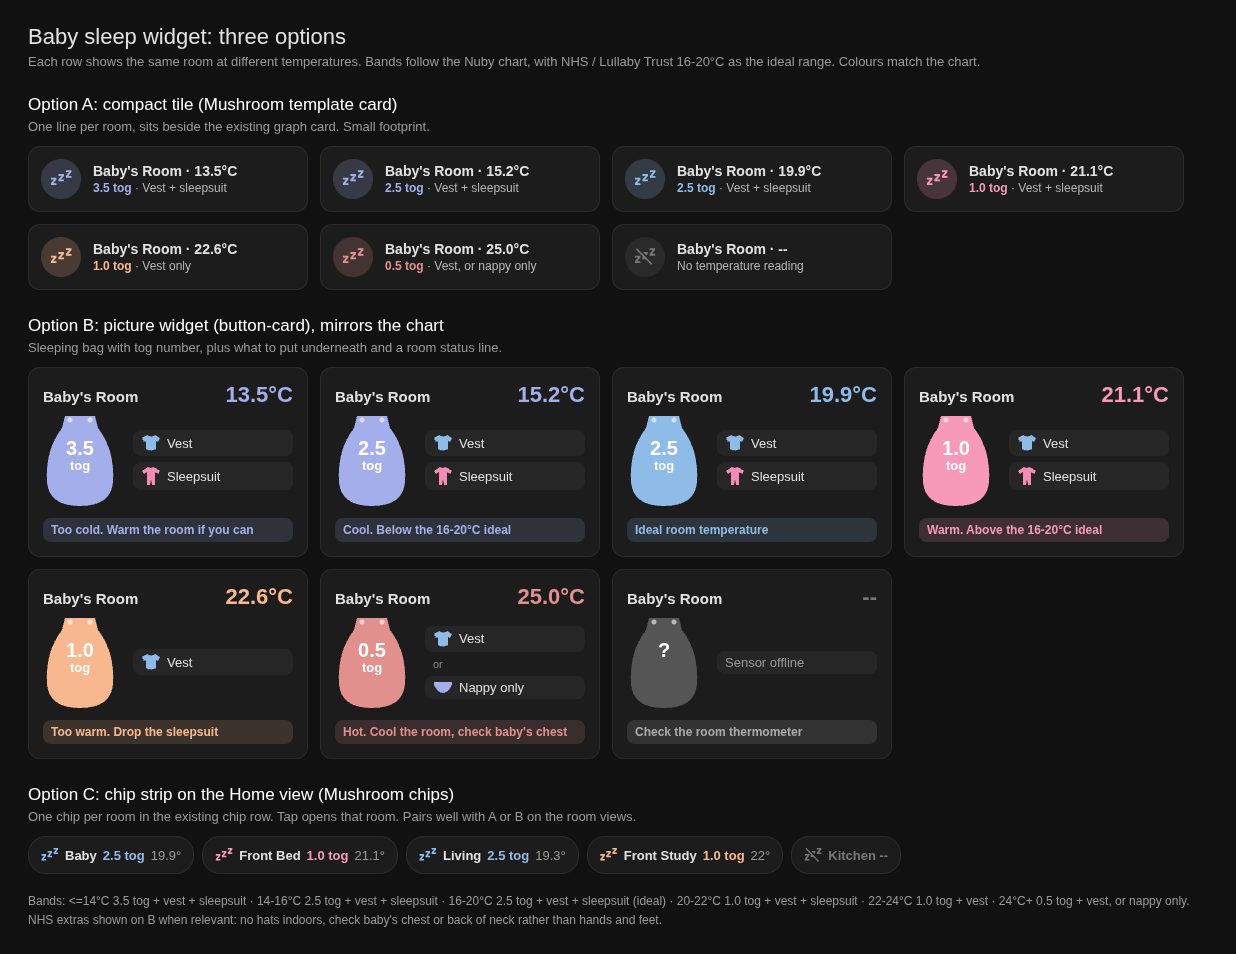
- A, a compact one-line tile using a Mushroom template card.
- B, a bigger button-card with a sleeping bag drawn in SVG, a clothing list and a status line.
- C, a strip of chips for the home view.
C was out quickly. A chip only has room for the tog, and the tog is half the answer. A 1.0 tog bag with a sleepsuit and a 1.0 tog bag with just a vest are different outfits.
B won. One change came from the first review: the number on the bag has to say “tog bag”, not just “tog”. Otherwise it reads as the total tog of everything baby is wearing, when it’s only the sleeping bag. The clothes list got an “Under the bag” heading for the same reason.
Prerequisites
- Home Assistant with a dashboard using the sections view (mine is on Core 2025.12)
- HACS, with button-card installed. I’m on v7.0.1
- A temperature sensor in each room. Mine are Sonoff SNZB-02 Zigbee sensors through Zigbee2MQTT, but anything with a numeric °C state works
No integrations, template sensors or restarts are needed. It’s all dashboard config.
Step 1: Add the template
Button-card templates live at the root of a dashboard’s config, alongside views:, not inside a view. To get there:
- Open the dashboard and click the pencil to edit.
- Three-dot menu → Raw configuration editor.
- Paste this at the very top, above
views:, and save.
button_card_templates:
  baby_sleep:
    show_icon: false
    show_state: false
    show_name: true
    tap_action:
      action: more-info
    variables:
      band: |-
        [[[
          const raw = parseFloat(entity?.state);
          if (isNaN(raw)) return null;
          const t = Math.round(raw * 10) / 10;
          const b = (tog, colour, clothes, status) => ({t, tog, colour, clothes, status});
          if (t <= 14) return b('3.5', '#a3aeea', ['vest', 'sleepsuit'], 'Too cold. Warm the room if you can');
          if (t < 16)  return b('2.5', '#a3aeea', ['vest', 'sleepsuit'], 'Cool. Below the 16-20°C ideal');
          if (t < 20)  return b('2.5', '#8fbbe9', ['vest', 'sleepsuit'], 'Ideal room temperature');
          if (t < 22)  return b('1.0', '#f799b8', ['vest', 'sleepsuit'], 'Warm. Above the 16-20°C ideal');
          if (t < 24)  return b('1.0', '#f7b88f', ['vest'], 'Too warm. Drop the sleepsuit');
          return b('0.5', '#e2908d', ['vest', 'or', 'nappy'], "Hot. Cool the room, check baby's chest");
        ]]]
    styles:
      card:
        - padding: 14px
      grid:
        - grid-template-areas: '"n n temp" "bag under under" "status status status"'
        - grid-template-columns: 80px 1fr auto
        - grid-template-rows: auto 1fr auto
        - column-gap: 12px
        - row-gap: 8px
      name:
        - justify-self: start
        - font-size: 16px
        - font-weight: '600'
      custom_fields:
        temp:
          - justify-self: end
          - font-size: 22px
          - font-weight: '600'
        bag:
          - justify-self: start
        under:
          - justify-self: stretch
          - align-self: center
          - text-align: left
        status:
          - justify-self: stretch
          - text-align: left
          - font-size: 13px
          - font-weight: '600'
          - color: '#2a2f4a'
          - border-radius: 8px
          - padding: 6px 9px
          - background: "[[[ return variables.band ? variables.band.colour : 'var(--disabled-color, #777)'; ]]]"
    custom_fields:
      temp: |-
        [[[
          const b = variables.band;
          return b ? `${b.t.toFixed(1)}°C` : '--';
        ]]]
      bag: |-
        [[[
          const b = variables.band;
          const fill = b ? b.colour : 'var(--disabled-color, #777)';
          const label = b
            ? `<div style="font-size:22px;font-weight:800;line-height:1">${b.tog}</div>
               <div style="font-size:12px;font-weight:700;line-height:1.1">tog<br>bag</div>`
            : `<div style="font-size:24px;font-weight:800">?</div>`;
          return `<div style="position:relative;width:74px;height:96px">
            <svg width="74" height="96" viewBox="0 0 74 96" style="position:absolute;inset:0">
              <path d="M22 4 L52 4 L55 16 Q72 38 70 70 Q68 94 37 94 Q6 94 4 70 Q2 38 19 16Z" fill="${fill}"/>
              <circle cx="27" cy="8" r="2.4" fill="#ffffffaa"/><circle cx="47" cy="8" r="2.4" fill="#ffffffaa"/>
            </svg>
            <div style="position:absolute;inset:30px 0 0 0;text-align:center;color:#2a2f4a">${label}</div>
          </div>`;
        ]]]
      under: |-
        [[[
          const b = variables.band;
          const pill = (svg, text) => `<div style="display:flex;align-items:center;gap:8px;font-size:14px;
            background:var(--secondary-background-color);border-radius:8px;padding:5px 9px">${svg}${text}</div>`;
          const vest = `<svg width="20" height="18" viewBox="0 0 20 18"><path d="M6 1 L1 4 L3 8 L5 7 L5 15 Q10 18 15 15 L15 7 L17 8 L19 4 L14 1 Q10 4 6 1Z" fill="#8fbbe9"/></svg>`;
          const suit = `<svg width="20" height="20" viewBox="0 0 20 20"><path d="M7 1 L1 5 L3 8 L6 6 L6 19 L9 19 L10 13 L11 19 L14 19 L14 6 L17 8 L19 5 L13 1 Q10 3 7 1Z" fill="#f38bb3"/></svg>`;
          const nappy = `<svg width="20" height="14" viewBox="0 0 20 14"><path d="M1 2 L19 2 L19 5 Q15 13 10 13 Q5 13 1 5Z" fill="#a3aeea"/></svg>`;
          const head = (t) => `<div style="font-size:12px;color:var(--secondary-text-color);margin-bottom:2px">${t}</div>`;
          if (!b) return head('Sensor offline');
          const items = b.clothes.map(c =>
            c === 'vest' ? pill(vest, 'Vest') :
            c === 'sleepsuit' ? pill(suit, 'Sleepsuit') :
            c === 'nappy' ? pill(nappy, 'Nappy only') :
            `<div style="font-size:12px;color:var(--secondary-text-color);padding-left:9px">or</div>`);
          return `<div style="display:flex;flex-direction:column;gap:6px">${head('Under the bag')}${items.join('')}</div>`;
        ]]]
      status: |-
        [[[
          const b = variables.band;
          return b ? b.status : 'No reading. Check the room thermometer';
        ]]]
How it works
The only logic is the band variable. Button-card evaluates it on every render and every custom_fields template reads variables.band, so the thresholds exist in exactly one place. It returns null when the sensor state isn’t a number (unavailable, unknown), and each field has a grey fallback for that case.
The rest is layout. The grid puts the name and temperature on the top row, the bag and the clothes list in the middle, and the status bar across the bottom. The sleeping bag, vest, sleepsuit and nappy are small inline SVGs, so there’s no image hosting and nothing extra to install.
The text on the coloured parts is a fixed dark navy (#2a2f4a), not the theme’s text colour. Those pastels are light enough that white text is hard to read on them, and a fixed dark colour reads fine in both light and dark themes.
Step 2: Add a card to each room
Each room card only needs the template, the sensor and a name:
type: custom:button-card
template: baby_sleep
entity: sensor.babys_room_temperature
name: Baby's Room
grid_options:
  columns: 12
  rows: auto
columns: 12 makes it full width in a sections view, and rows: auto lets it size to its content. I put one directly under each room’s existing mini-graph-card temperature graph, so the history sits right above the advice.
I added it to seven rooms. I edited mine with a small Python script over Home Assistant’s websocket API (lovelace/config to read, lovelace/config/save to write), so re-running it updates the template and only adds cards that are missing. For a handful of rooms the card editor’s YAML mode does the same job.
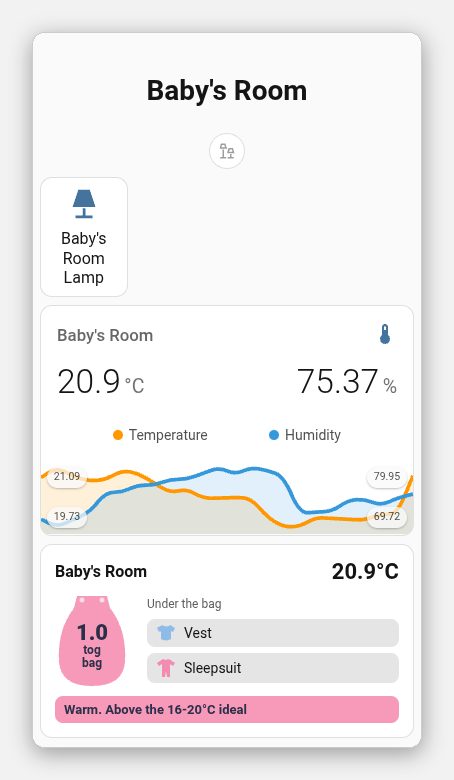
Here’s the nursery, on a phone, a few hours after I set it up. The room has warmed to 20.9°C, so it has moved on its own from 2.5 tog to 1.0 tog:
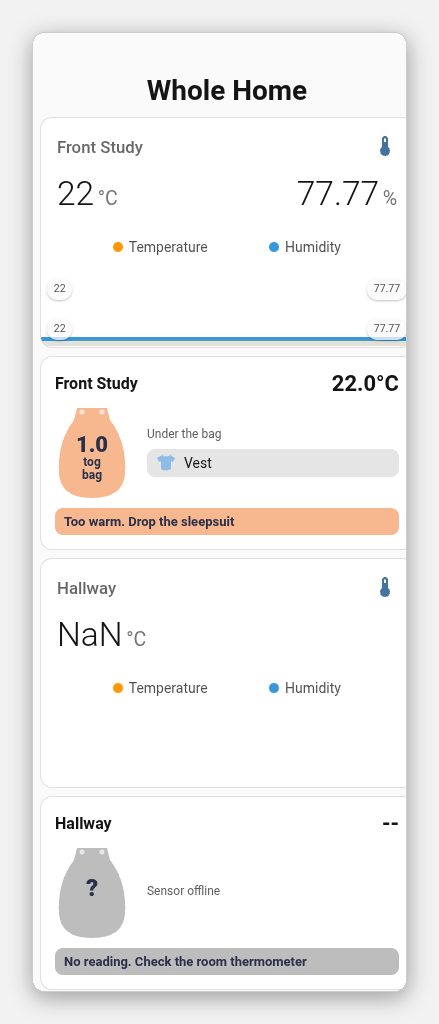
And a view with two rooms. The study at 22°C has dropped the sleepsuit, and the hallway sensor is offline, so its card has gone grey instead of showing a stale number:
Does it update live?
Yes. Home Assistant pushes state changes to the open dashboard, and button-card redraws when its entity changes. The temperature, bag, clothes and status all move together without a refresh.
It can only be as current as the sensor, and there are two limits to know about:
- Sensors don’t stream. Battery Zigbee sensors like the SNZB-02 report when the temperature changes by a set step or on a timer, so the card follows the room with a lag of a few minutes.
- A silent sensor looks alive for a while. Zigbee2MQTT only marks a battery device unavailable after its passive availability timeout, which defaults to 1500 minutes. Mine is set to 300, so a dead sensor can show its last reading for up to five hours before the card goes grey. For a nursery that’s the one I’d tighten next, either by lowering the timeout for that sensor or by greying out the card when
last_updatedis more than 30-60 minutes old.
Changing the bands
All the thresholds are in the band variable at the top of the template. Change a number or a colour there and every room card follows. If your sleeping bags are 0.2 / 1.0 / 2.5 / 3.5 tog, or your own chart draws the lines elsewhere, that’s the only place to edit.
Troubleshooting
“Button-card template ‘baby_sleep’ is missing!”
The template ended up inside a view. button_card_templates: has to sit at the top level of the dashboard YAML, next to views:.
Card padding is ignored
Button-card wants each style as its own key/value object in a list (- padding: 14px). I first wrote it as a plain string (- "padding: 14px"), which gets silently ignored, and the card sat flush against its border.
The room name gets cut off with “…”
My first grid put the name in the 80px bag column, so “Baby’s Room” came out as “Baby’s Ro…”. The three-column grid above ("n n temp") gives the name the bag column plus the middle column.
Card shows -- for a sensor that’s working
The state isn’t parsing as a number. Check the entity in Developer Tools → States. If the state is fine, make sure the card’s entity: is the temperature sensor and not the humidity one or the device.
“Custom element doesn’t exist: button-card”
The HACS resource isn’t loaded. Check Settings → Dashboards → Resources and hard-reload the browser (Ctrl+Shift+R).
This sits nicely on a wall-mounted tablet too. If you want one in the nursery, the Fire HD8 as a Home Assistant control panel post covers setting one up with a restricted user.
Worth the afternoon
It’s one card, copied seven times, and it hasn’t once been the wrong answer at 2am. That’s the whole pitch. The room already knew its own temperature; it just wasn’t allowed to finish the sentence. Now it does, in a colour I can read without my glasses.
The tog chart’s still bookmarked, for the day the sensors are all offline and I’m back to doing it the old way.
Or just hand this page to your agent
Six YAML blocks and a raw config editor is exactly the kind of chore an agent should be doing instead of you:
Read https://exitcode0.net/posts/home-assistant-baby-sleep-tog-widget/ and set up the
same button-card template and per-room cards on my Home Assistant dashboard. Ask me
for my actual room names and temperature sensor entity IDs first, and show me the
YAML before you save anything.
Everything it needs is on this page: the template, the per-room card, and the tog bands to start from. It still needs you for the two things only you know: which sensor lives in which room, and whether your own sleeping bags match the tog chart I used or a different one entirely.
Then it’s just a case of nudging the bands to match your bags, dropping a card under whichever tablet is nearest the cot, and getting a few of those 2am minutes back.
Enjoy. ✌️