As I write this, my computer’s Nvidia RTX GPU is busy converting watts into fictional images of robots and given the current cost of electricity, I am asking myself if the results it is producing are worth the resources required to produce them. In the article I hope to demonstrate how I am using AUTOMATIC1111/stable-diffusion-webui and Mikubill/sd-webui-controlnet to generate some borderline “art”. If you are looking to skip ahead to certain section, you can jump ahead using the table of contents above.
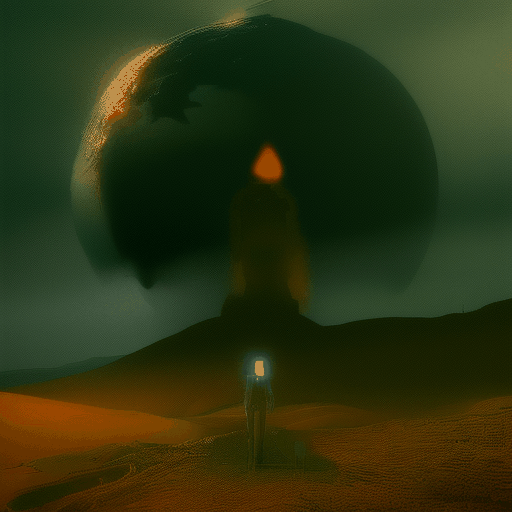
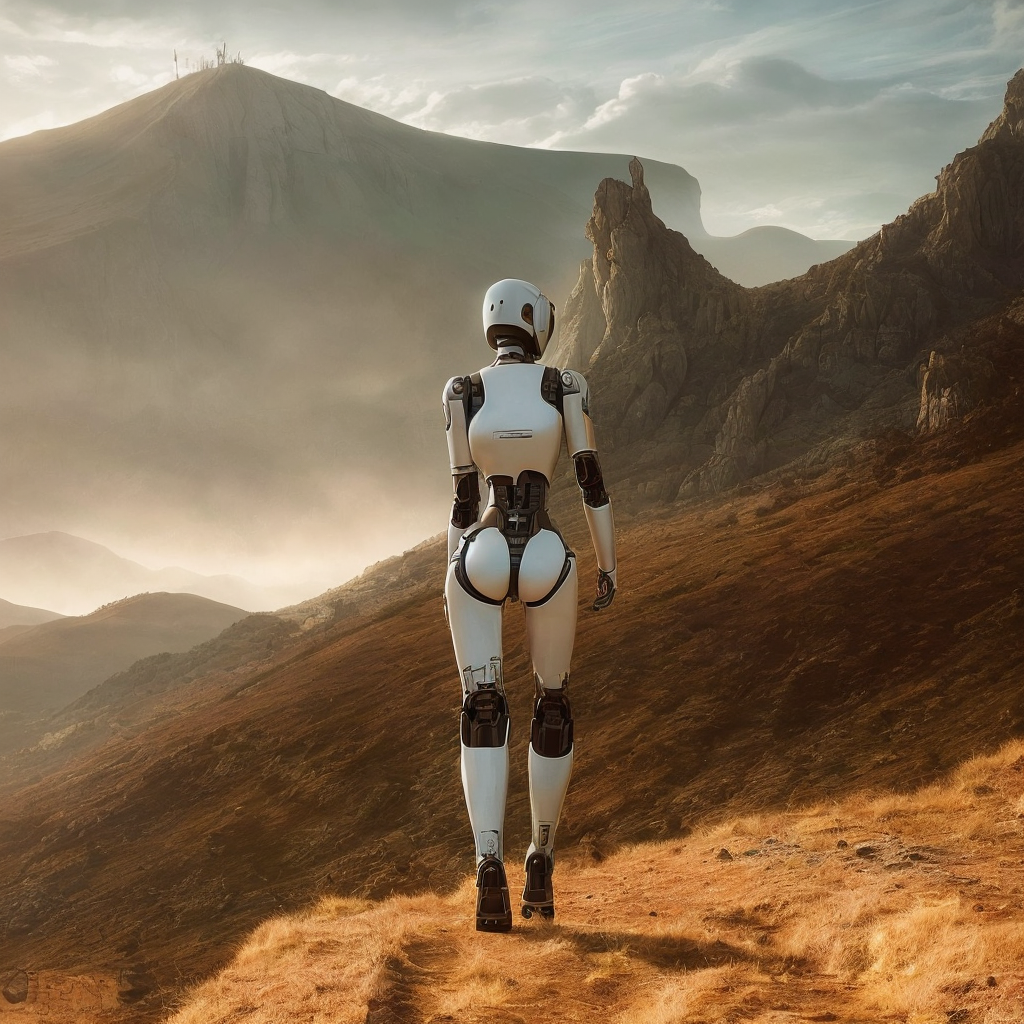
Prompt: ‘A robot emerging from a cave’
Definitions and Abbreviations:
Some common abbreviations and terms that you might encounter in this article or other sites whilst researching this topic:
SD: stable-diffusion
a111: AUTOMATIC1111
CFG: Classifier Free Guidance Scale
Seed: A value that determines the output of random number generator - if you create an image with same parameters and seed as another image, you’ll get the same result
Sampling Steps: How many times to improve the generated image iteratively; higher values take longer; very low values can produce bad results
CFG scale: how strongly the image should conform to prompt - lower values produce more creative results
Installing AUTOMATIC1111’s stable-diffusion-webui (Windows)
AUTOMATIC1111’s stable-diffusion-webui is a web interface for Stable Diffusion, implemented using Gradio library. This project makes txt2img and img2img generation possible much like a lot of popular online services such as DALL·E and Midjourney, but instead allowing you to run it locally and for free (minus the cost of computer hardware and power). You should know that Stable Diffusion is in fact the product of Stability AI and AUTOMATIC1111’s stable-diffusion-webui allows us to make use of the open source models that Stability AI and many others have released.
Pre-Requisite Dependencies
Before you get started, there are some additional components that you will need to install first. You may chose to download a newer version of python3, such as python 3.11.X; your mileage may vary and you might have some package compatibility issues.
Python 3.10.6: https://www.python.org/downloads/release/python-3106/
Code from the AUTOMATIC1111/stable-diffusion-webui repository:
git clone https://github.com/AUTOMATIC1111/stable-diffusion-webui
Once you have complete the above steps. Open a command prompt in your stable-diffusion-webui directory and run the following command:
./webui-user.bat
Addition arguments such as --api can be added if you want to run the tool with additional features enabled. These arguments can only be passed to the program by launching from the command prompt, rather than just running the .bat file from Windows explorer. A full ist of arguments: https://github.com/AUTOMATIC1111/stable-diffusion-webui/wiki/Command-Line-Arguments-and-Settings. The full command that I use to launch (with additional performance arguments) is as follows:
.\webui-user.bat --api --no-half --opt-split-attention --xformers
Once the .bat completes the local packages and dependency installation, it will launch your default browser to http://127.0.0.1:7860/. Now you are ready to start generating “art” - be sure to keep your command prompt window running; closing this window will stop stable-diffusion-webui.
AUTOMATIC1111/stable-diffusion-webui running on on our local machine.
If you are looking to run this on an Apple Silicon based system (M1/M2/M3), instructions can be found here: https://github.com/AUTOMATIC1111/stable-diffusion-webui/wiki/Installation-on-Apple-Silicon
Adding Models
Models can often be referred to as “checkpoints”; they are files that contain a collection of neural network parameters and weights trained using images as inspiration. Models trained on a particular type of subject matter will have a better chance of creating similar images; want anime style images… use a model trained on anime.
You can add any additional model files to your stable-diffusion-webui models path:
For example: C:\AI\stable-diffusion-webui\models\Stable-diffusion
Here are some links to models that I have tested and a highly subjective and unscientific success rating:
| Model | Repository URL | Personal Success Rating |
|---|---|---|
| v1-5-pruned-emaonly.safetensors | huggingface.co/runwayml | 3/5 stars |
| (v2)512-base-ema.ckpt | huggingface.co/stabilityai/stable-diffusion-2-base | 3/5 stars |
| v2-1_768-ema-pruned.ckpt | huggingface.co/stabilityai/stable-diffusion-2-1 | 3/5 stars |
| robo-diffusion-v1.ckpt | huggingface.co/nousr/robo-diffusion | 2/5 stars |
| Chilloutmix-Ni-pruned-fp16-fix.safetensors | huggingface.co/swl-models/chilloutmix-ni fp16 | 4/5 stars |
| chilloutmix-Ni-non-ema-fp32.safetensors | huggingface.co/swl-models/chilloutmix-ni non-ema-fp32 | 4/5 stars |
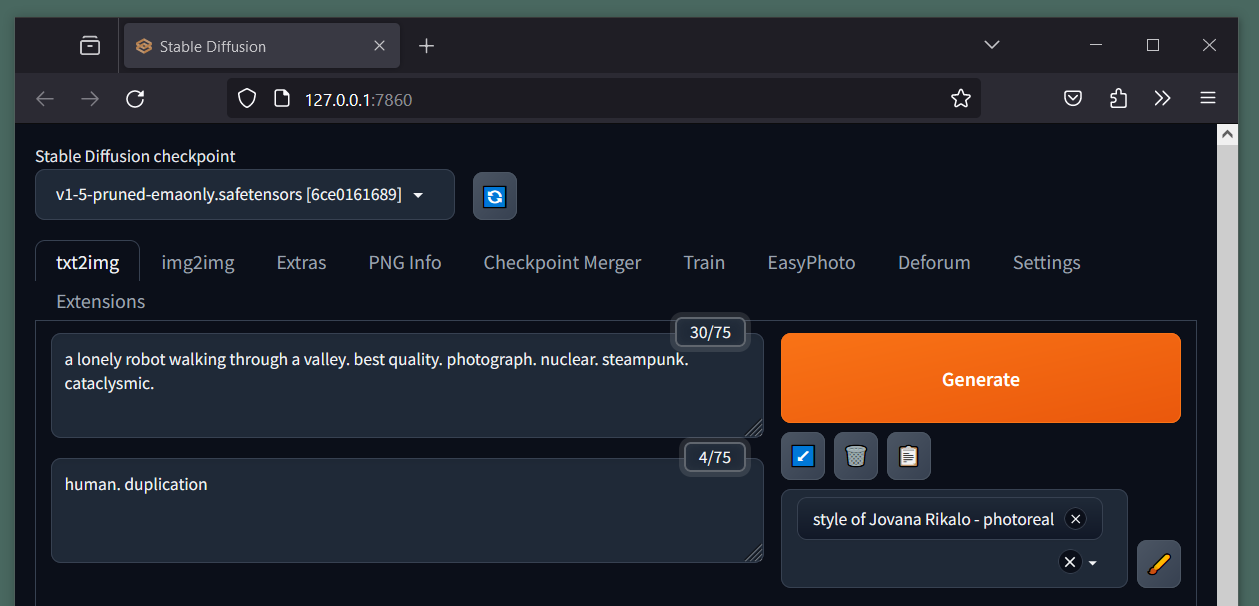
You should note that it is possible to use the SD Refiner feature to switch models part way through the generation process and define at what stage of generation that should happen. So in the example of the following prompt, we can switch models to something based on a relevant training dataset:
a lonely bipedal robot walking through a valley. best quality. photograph. nuclear. cataclysmic. end of the world
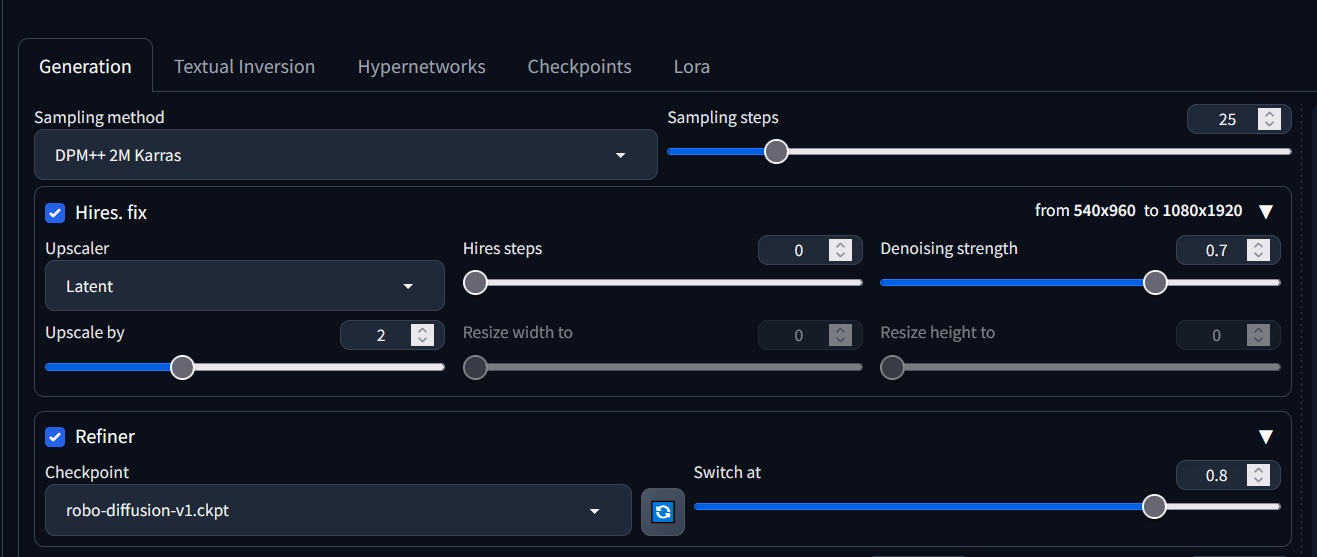
Enabling refinement with a model based on a highly specific training dataset.
The Switch At setting determines the fraction of sampling steps when the switch to refiner model should happen; 1=never, 0.5=switch in the middle of generation.
Prompt Techniques
Before we continue, I would like to warn you that most certainly from a relative beginner’s perspective, image generation with SD is a bit of a fuzzy logic. There appears to be no certain method to govern the type of image that is produced; you can only tweak guidance where possible using the tools available to you and the model will ultimate decided on the output. These models are trained against a vast number of parameters and are essentially guessing what each pixel should look like based on trends observed in the train data set.
Therefore I would suggest that you approach this with patience and try to record your methodology and steps taken to reach a visual output that you are happy with. Change only one variable at a time, but understand that the inherent randomness out the image generation could still provide an unsatisfactory result.
Negative Prompts
In the same way that (positive) prompts help define your expected outcomes, negative prompt help to shape the generated image by providing SD with a list ob objects and types to avoid when it is consulting its inference model.
For example, you want to generate a portrait, but Stable Diffusion provided duplicates faces or bodies. A negative prompt including the phrase “duplicates” would provide a high-dimension anchor, which the process seek to stray away from.
Prompt Examples
- Prompt:
a lonely bipedal robot walking through a valley. best quality. photograph. nuclear. cataclysmic. end of the world- Negative:
human. duplicates. hair
- Negative:
- Prompt:
A hyper realistic avatar of a man riding on a black honda cbr 650r in leather suit,high detail, high quality,8K,photo realism- Negative:
flying mirrors,low quality
- Negative:
- Prompt:
electronik robot and ofice ,unreal engine, cozy indoor lighting, artstation, detailed, digital painting,cinematic,character design by mark ryden and pixar and hayao miyazaki, unreal 5, daz, hyperrealistic, octane render- Negative:
ugly hands, disjointed
- Negative:
More fantastic prompt examples can be found here: Prompt examples - Stable Diffusion .
You can skip ahead to see more results here in the results comparison section.
Provided that no generation configuration values are changed and a fixed seed is defined (including Hires Fix settings), you will always get the same output from the vision model. Each time to you generate an image, the webui shows your the parameters used; there for you could replicate any image using these parameters. Try this:
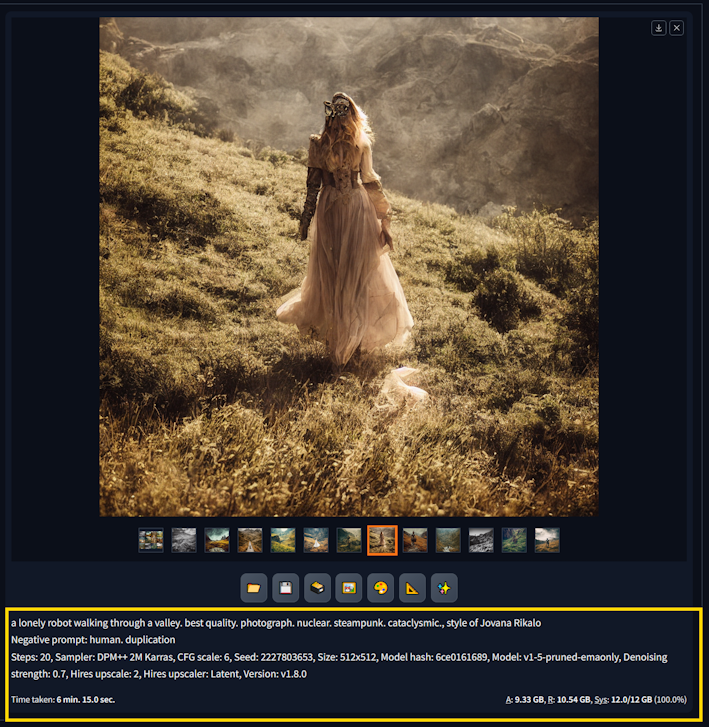
Using the SD output parameters to recreate identical images.
One thing you must understand, if you increase the Batch Count, the seed value still increments (by 1, at default).
Better still, if you are using the --api, you could pass parameters in your API GET request. You can read more about the API here: stable-diffusion-webui/wiki/API. There you will find a link to this useful python script for getting started with requests over the API: txt2img and img2img example python script.
Styles
Style are an amendment to a prompt and can have a offer a very strong level of control over the type of image that SD is going to produce for you. Ordinarily, an artist would have their style of work classified as a particular type of work. Therefore a model trained on a wide array of data should have an understanding of what each of these styles might look like and be able to make better predictions for the next generated pixel.
One of the best resources I have encountered is this style cheat sheet: supagruen.github.io/StableDiffusion-CheatSheet. Simply pick a style you are interested in, copy the style prompt and append it to your existing prompt in stable-diffusion-webui. The sit splits out the styles with tags and categories to help you pick your perfect style. This has to be one of the most valuable AI image generation resources to date.

Stable Diffusion 1.5 - Cheat Sheet.
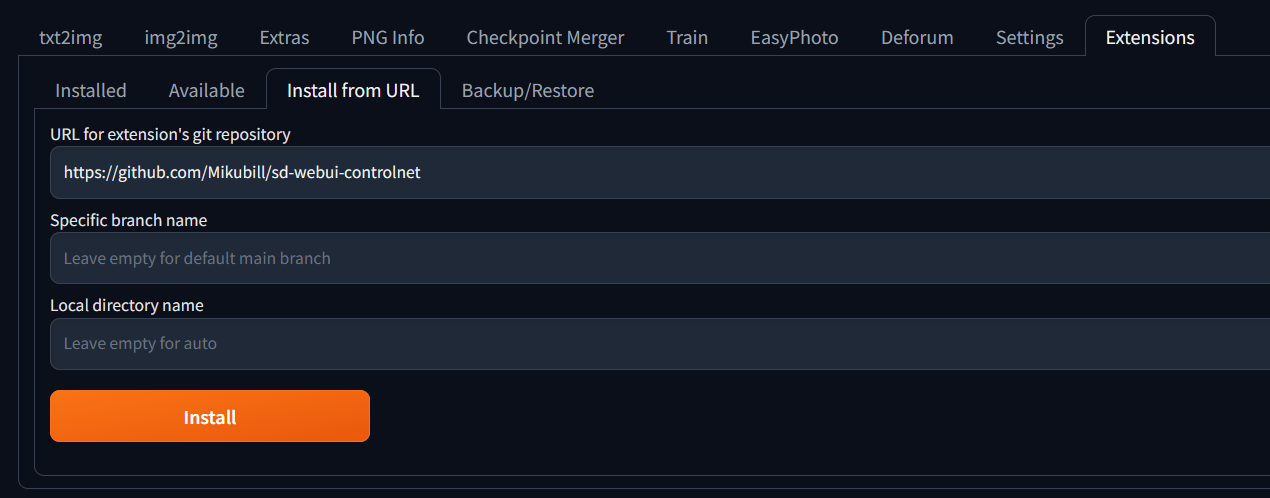
Installing Mikubill’s sd-webui-controlnet
Installing extensions in stable-diffusion-webui is ordinarily a very user friendly, low skill process. There are a large number of community produced plugins that enable a huge amount of features in SD.
So let’s install ControlNet:
- Open “Extensions” tab.
- Open “Install from URL” tab in the tab.
- Enter https://github.com/Mikubill/sd-webui-controlnet.git to “URL for extension’s git repository”.
- Press “Install” button.
- Wait until you see the message “Installed into stable-diffusion-webui\extensions\sd-webui-controlnet”.
- Go to “Installed” tab, click “Check for updates”, and then click “Apply and restart UI”.
- Completely restart A1111 webui - end the command-prompt/terminal window and launch again.
Installing Mikubill’s sd-webui-controlnet
Should you need to forcefully remove this or any other extension, you can simply delete the extension named folder from the following path:
~ \stable-diffusion-webui\extensions
Controlnet Techniques
Canny
I have found that sometimes enabling ControlNet can harm the creativity of text2img generation, irrespective of your classifier free guidance (CFG) scale value. Controlnet can be tweaked to respect the prompt with a higher priority, but it can lead to some questionable outputs due to it’s influence. My experimenting with Controlnet functionality is currently incomplete and I hope to cover my findings in a future article. It is best used with very loose control influence and with an image that closely resembles your desired outcome. This is why, it can be great for human faces, when paired with an appropriate model and style.
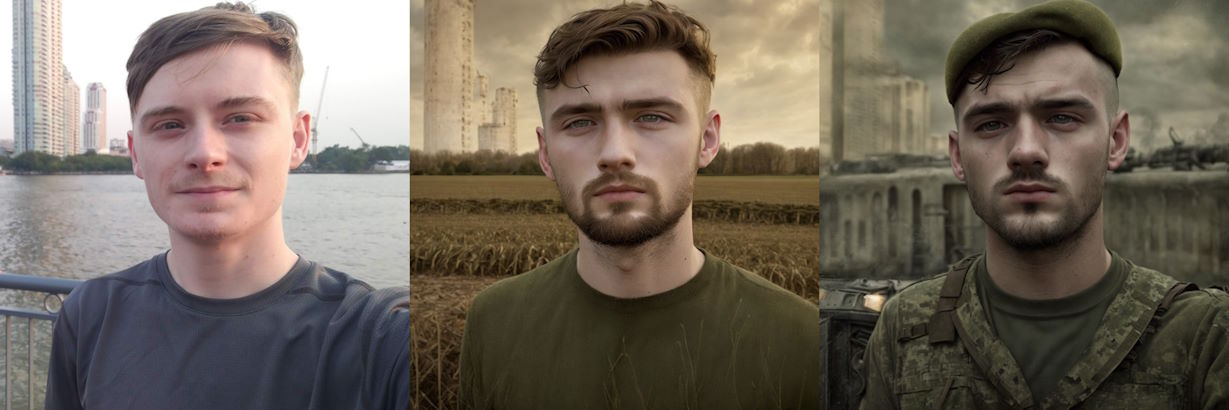
Using Canny to paint myself as a soldier in World War 2 and World War 3.
OpenPose
This ContorlNet module aims to by add extra conditions to the neural network structure in order to control diffusion model outcomes; OpenPose does this with human pose estimation. Needless to say, that works best on humanoid subjects. The module can analyse an image to produce a wireframe for human poses and this is applied to conditions of generation.
Here is how we can configure openpose in the controlnet plug section of the SD-webui interface:
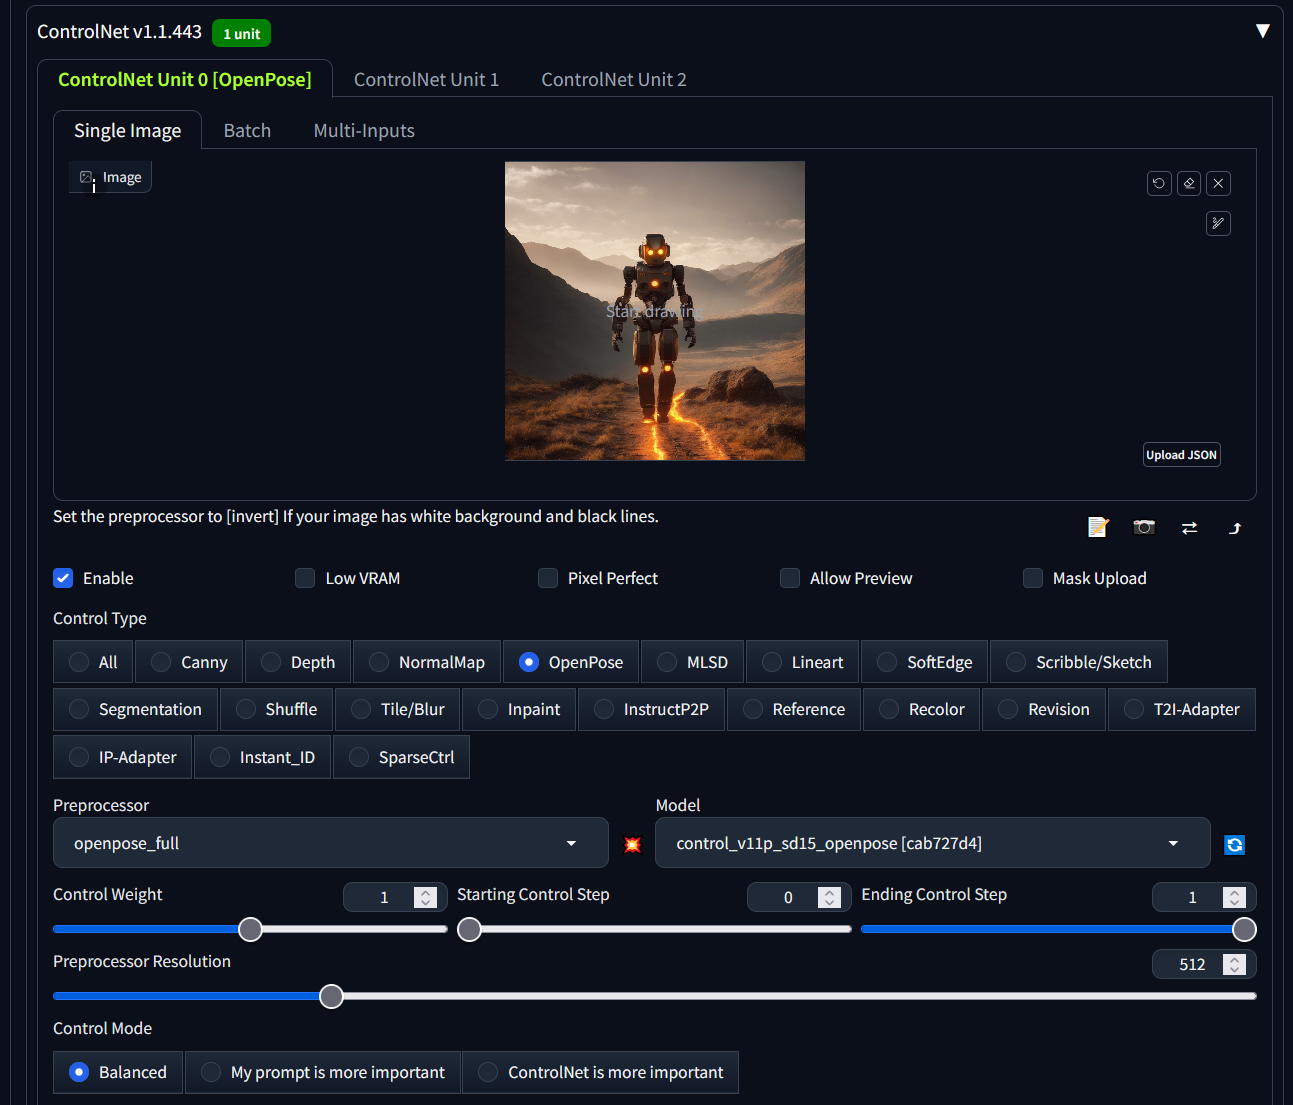
ControlNet OpenPose using default values.
This results in the following wireframe pose detection - not a perfect capture due to a slightly ambiguous input image of a non-human entity:
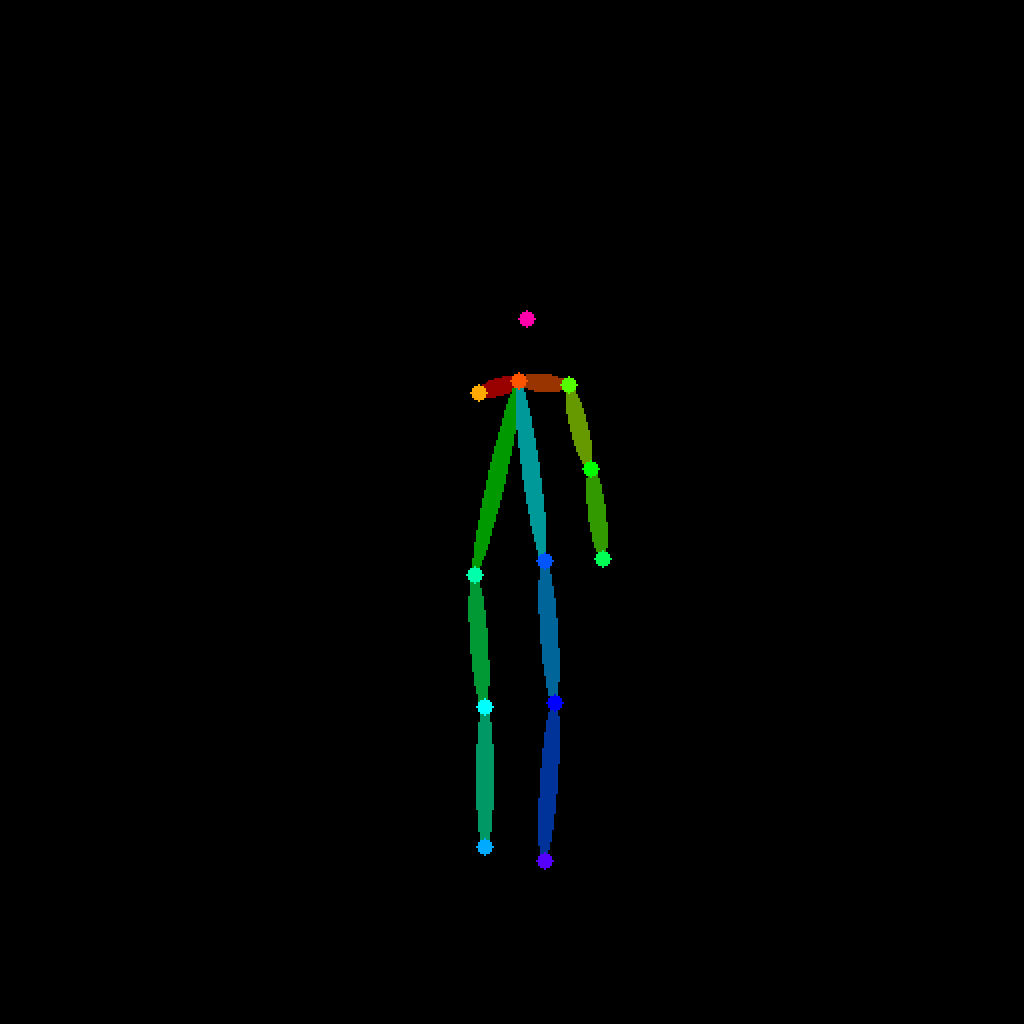
ControlNet OpenPose generating a pose structure based on an input image.
Ultimately resulting in some very nice output images, which adhere to our prompt, provide creativity and strike the same pose. I believe that the slight issue in the pose is what caused SD to confuse the direction that the subject was facing in some images.
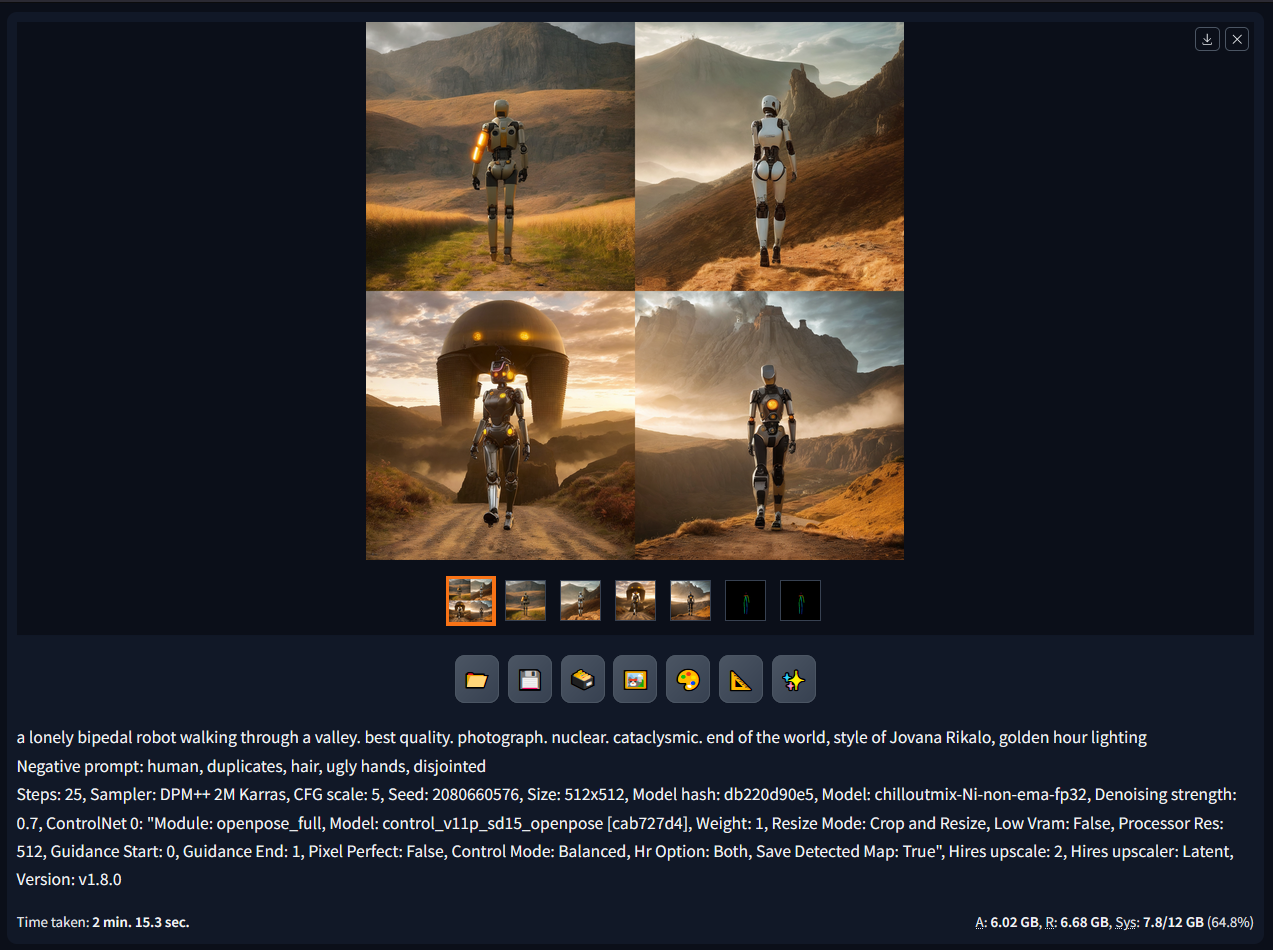
ControlNet OpenPose generating a batch of 4 images based on our wireframe and prompt.
Image Resolution and Performance
You’re available hardware is going to make a large difference in generation time. As a general rule of thumb, graphics cards with a high memory availability offer better performance during inference based task such as Stable Diffusion. Howwever, the Nvidia GPUs, particularly RTX GPUs which saw the introduction of Tensor cores, clearly have the computational advantage:
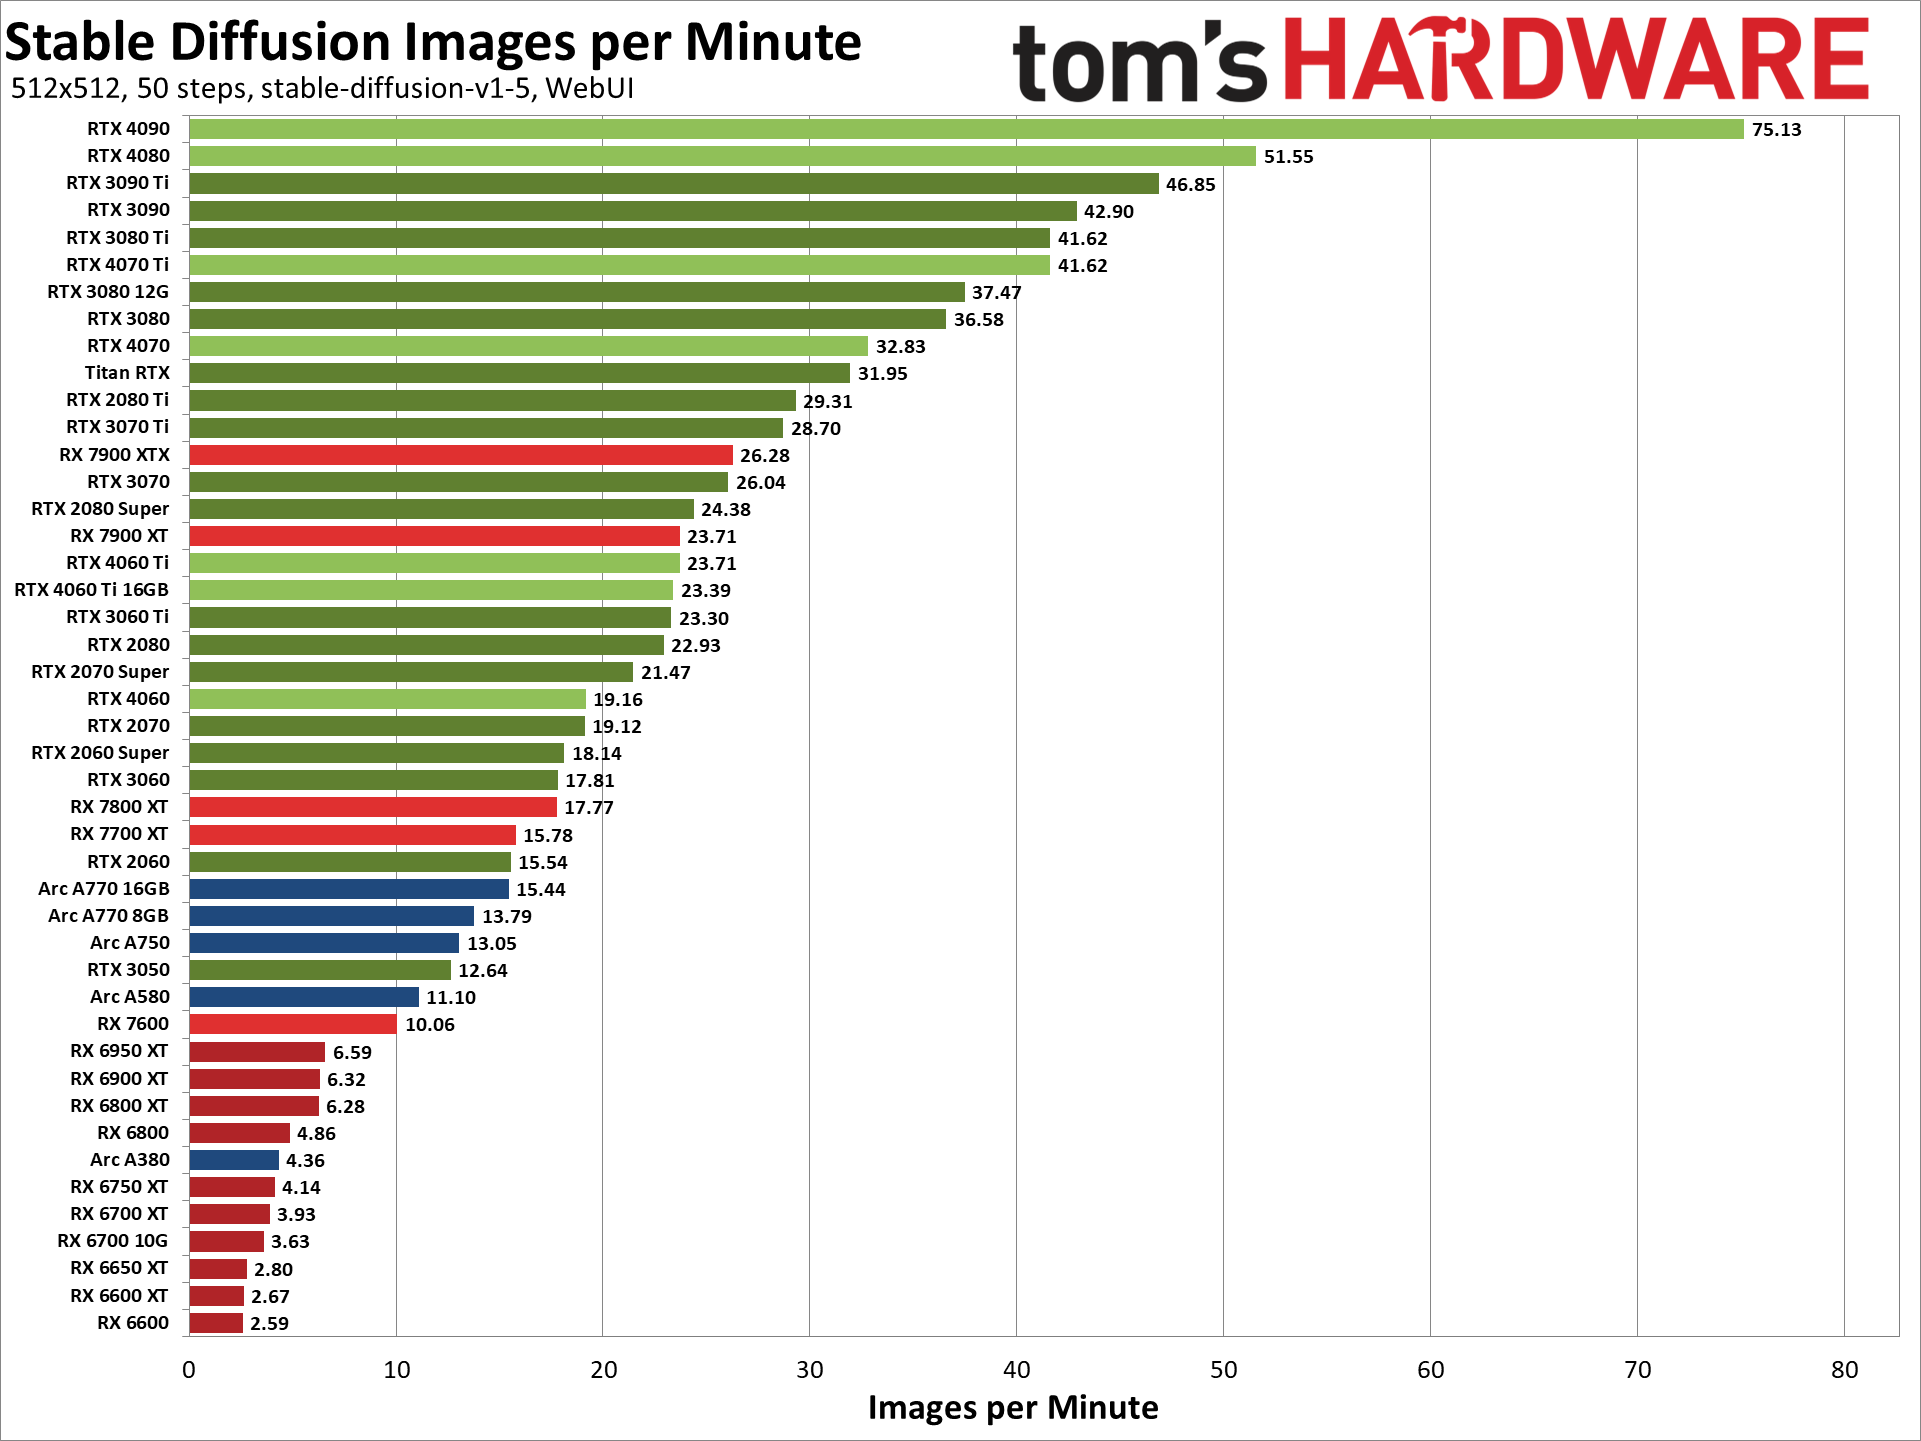
Whilst it is not entirely necessary to have an RTX graphics card, using one will significantly reduce your generation times. Nvidia is quite literally selling shovels in a gold rush…
Here are some performance optimization options that can be applied using command-prompt/terminal flags:
| Commandline argument | Explanation |
|---|---|
--opt-sdp-attention | May results in faster speeds than using xFormers on some systems but requires more VRAM. (non-deterministic) |
--opt-sdp-no-mem-attention | May results in faster speeds than using xFormers on some systems but requires more VRAM. (deterministic, slightly slower than --opt-sdp-attention and uses more VRAM) |
--xformers | Use xFormers library. Great improvement to memory consumption and speed. Nvidia GPUs only. (deterministic as of 0.0.19 [webui uses 0.0.20 as of 1.4.0]) |
--force-enable-xformers | Enables xFormers regardless of whether the program thinks you can run it or not. Do not report bugs you get running this. |
--opt-split-attention | Cross attention layer optimization significantly reducing memory use for almost no cost (some report improved performance with it). Black magic. On by default for torch.cuda, which includes both NVidia and AMD cards. |
--disable-opt-split-attention | Disables the optimization above. |
--opt-sub-quad-attention | Sub-quadratic attention, a memory efficient Cross Attention layer optimization that can significantly reduce required memory, sometimes at a slight performance cost. Recommended if getting poor performance or failed generations with a hardware/software configuration that xFormers doesn’t work for. On macOS, this will also allow for generation of larger images. |
--opt-split-attention-v1 | Uses an older version of the optimization above that is not as memory hungry (it will use less VRAM, but will be more limiting in the maximum size of pictures you can make). |
--medvram | Makes the Stable Diffusion model consume less VRAM by splitting it into three parts - cond (for transforming text into numerical representation), first_stage (for converting a picture into latent space and back), and unet (for actual denoising of latent space) and making it so that only one is in VRAM at all times, sending others to CPU RAM. Lowers performance, but only by a bit - except if live previews are enabled. |
--lowvram | An even more thorough optimization of the above, splitting unet into many modules, and only one module is kept in VRAM. Devastating for performance. |
*do-not-batch-cond-uncond | Only before 1.6.0: prevents batching of positive and negative prompts during sampling, which essentially lets you run at 0.5 batch size, saving a lot of memory. Decreases performance. Not a command line option, but an optimization implicitly enabled by using --medvram or --lowvram. In 1.6.0, this optimization is not enabled by any command line flags, and is instead enabled by default. It can be disabled in settings, Batch cond/uncond option in Optimizations category. |
--always-batch-cond-uncond | Only before 1.6.0: disables the optimization above. Only makes sense together with --medvram or --lowvram. In 1.6.0, this command line flag does nothing. |
--opt-channelslast | Changes torch memory type for stable diffusion to channels last. Effects not closely studied. |
--upcast-sampling | For Nvidia and AMD cards normally forced to run with --no-half, should improve generation speed. |
If unlimited power is what you seek and you are running SD on Windows, in Nvidia control panel, 3d parameters, change your power profile to “maximum performance”. You are now trading even more money for faster images.
Size Matters
Unfortunately, size does matter when it comes to performance… the larger the resolution, the more memory resources you are going to require. By default SD targets 512px x 512px. My best advice is to target a small resolution whilst you build an understanding of the models and controls needed to reach your ambitions with SD. This will allow you to quickly make small, iterative changes and have a faster feedback loop, whilst you work out which settings are best for your use case.
Unfortunately, your available memory resources may be the limit to the maximum output resolution; a work around is to use upscaling.
Hires Fix
Uses a two step process to partially create an image at smaller resolution (such as 512px x 512px), upscale, and then improve details in it without changing composition. So let’s say that we want to optimise our image output for max quality Instagram stories, we can set a width of 540px, a height of 960px and an upscale factor of 2; giving a 1080px by 1920px image.
One setting that we must consider is Denoising strength - this determines how little respect the algorithm should have for image’s content. At 0, nothing will change, and at 1 you’ll get an unrelated image. With values below 1.0, processing will take less steps than the Sampling Steps slider specifies. I have found that best results are when left at the default value of 0.7.
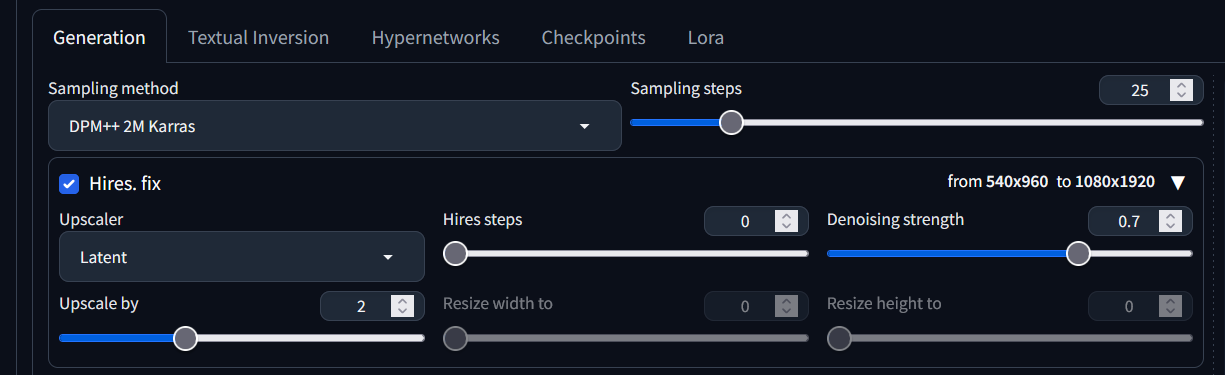
AUTOMATIC1111/stable-diffusion-webui with Hires set to scale images by a factor of 2.
Upscaling
It is the year 2024 and if we are being truthful, 512px by 512px images look like an early Fallout game and 1024px by 1024px is also unacceptable in this age of retina displays. Fortunately, we can use the upscaling feature in SD-webui to grace our eyeballs with higher resolution images, after generation. Let’s take a look at how to upscale in SD-webui:
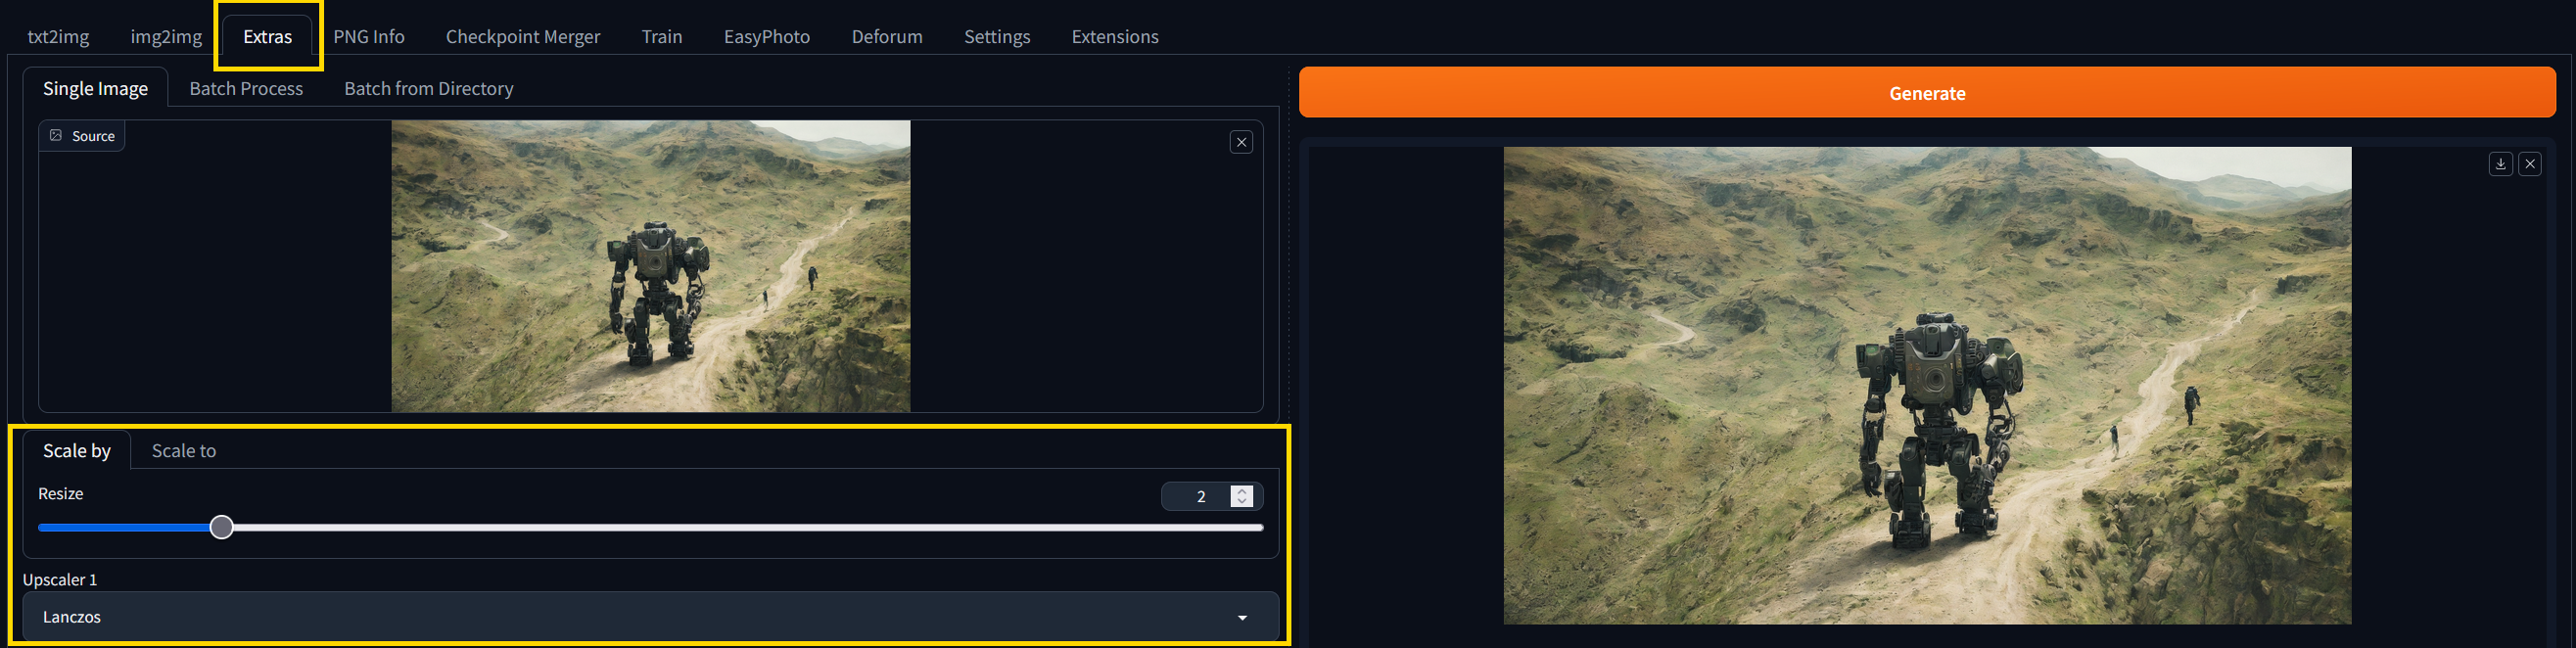
Upscaling with the Extras tab.
The above figure takes out 1920px by 1080px image and upscales it to 3840px by 2160px. The main caveat to upscaling is that unlike Hires Fix, we are not adding detail when we expand the image because no sampling is taking place.
Power Consumption
A quick note on power consumption. Living in a western nation, power costs are not an insignificant expense and as we have learned, running local software like stable-diffusion-webui and LMStudio induces a significant load on a computer for an extended period of time. Here is some back of a napkin maths for an RTX 3060 (12GB) running at stock clock settings (Ryzen 5600, 32GB DDR4, 1x m.2 SSD):
Consumption in watts during generation: 480
Time take in hours to generate 10 images at 1024 x 1024: 1.2
Electricity rate per kWh: £0.24

£0.14 per 1.2 hours
~£0.01 per image
This might not seem like much but I have spent somewhere in the region of 48 hours running generation just in the processing of learning and developing this article. That’s £5.64 at current rates… so consider buying me a coffee?
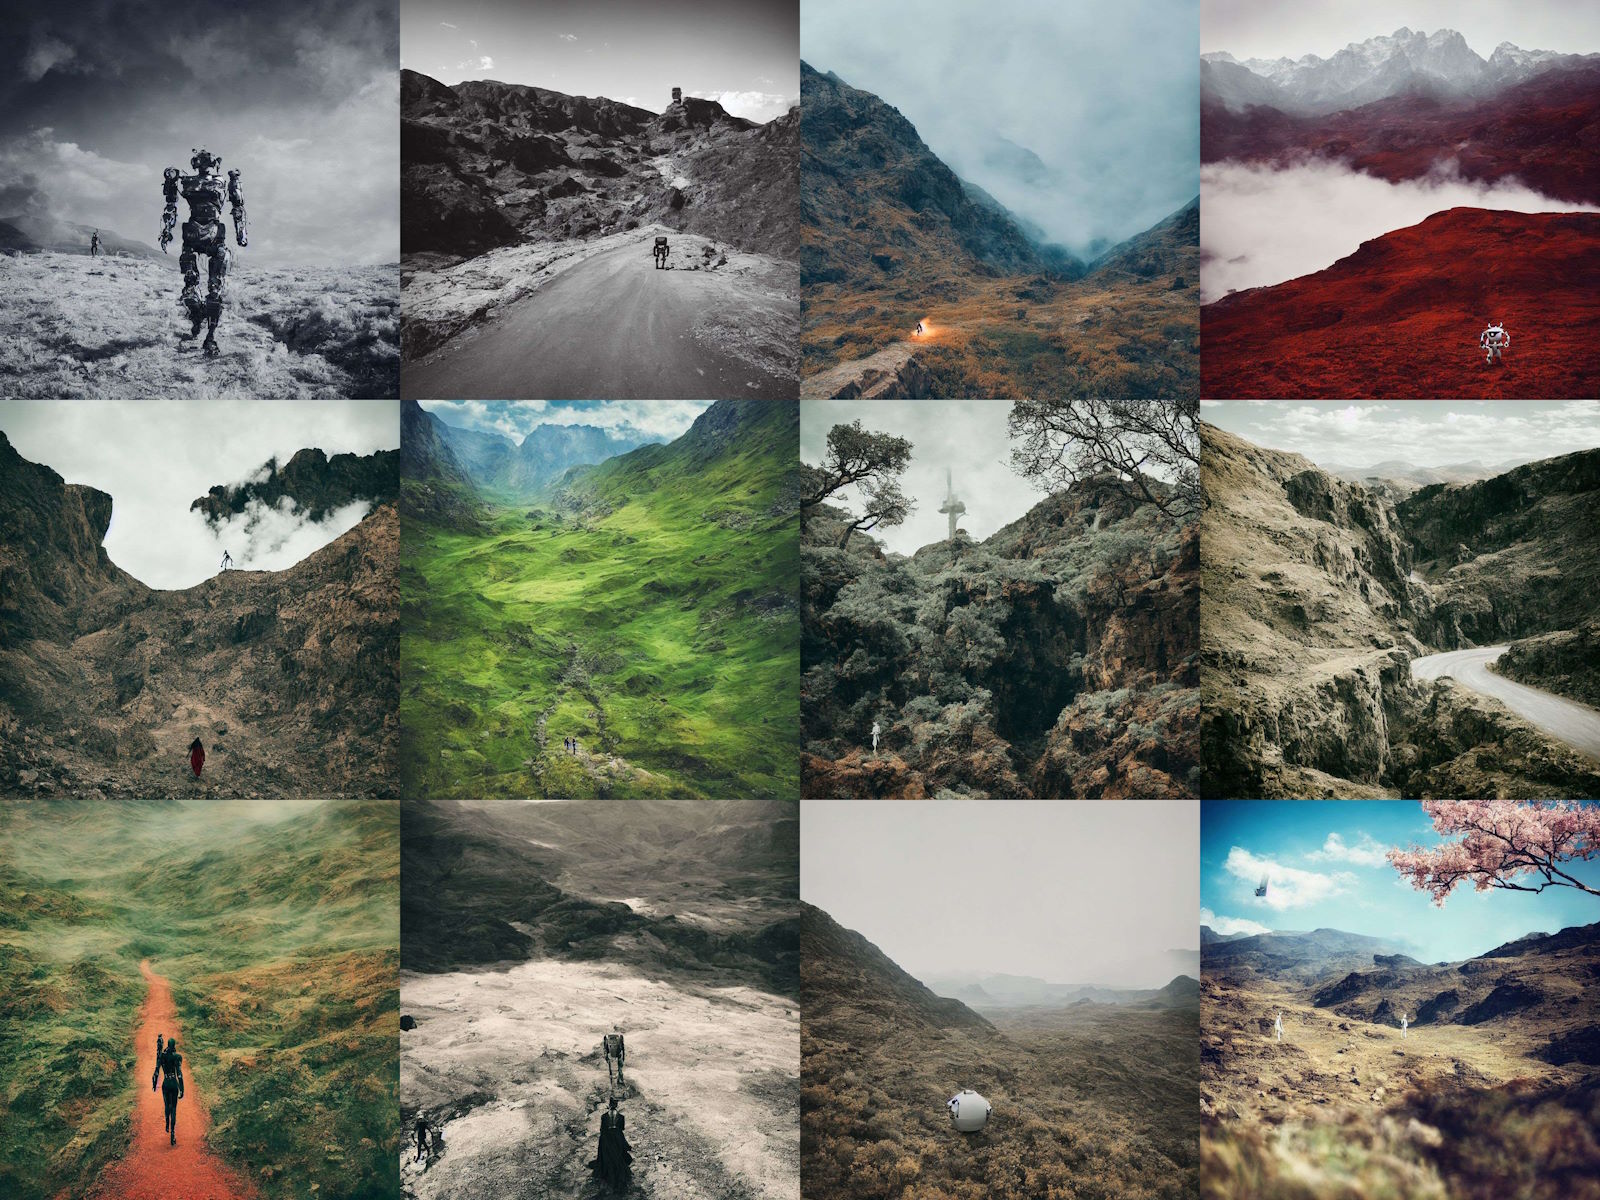
Results
So if you haven’t already gathered, there are a lot of variables that we can modify to guide the image generation process and produce a result that we are aiming for. Let’s take a look at what sand can do when we teach it to think… here are some of my favourite images so far:
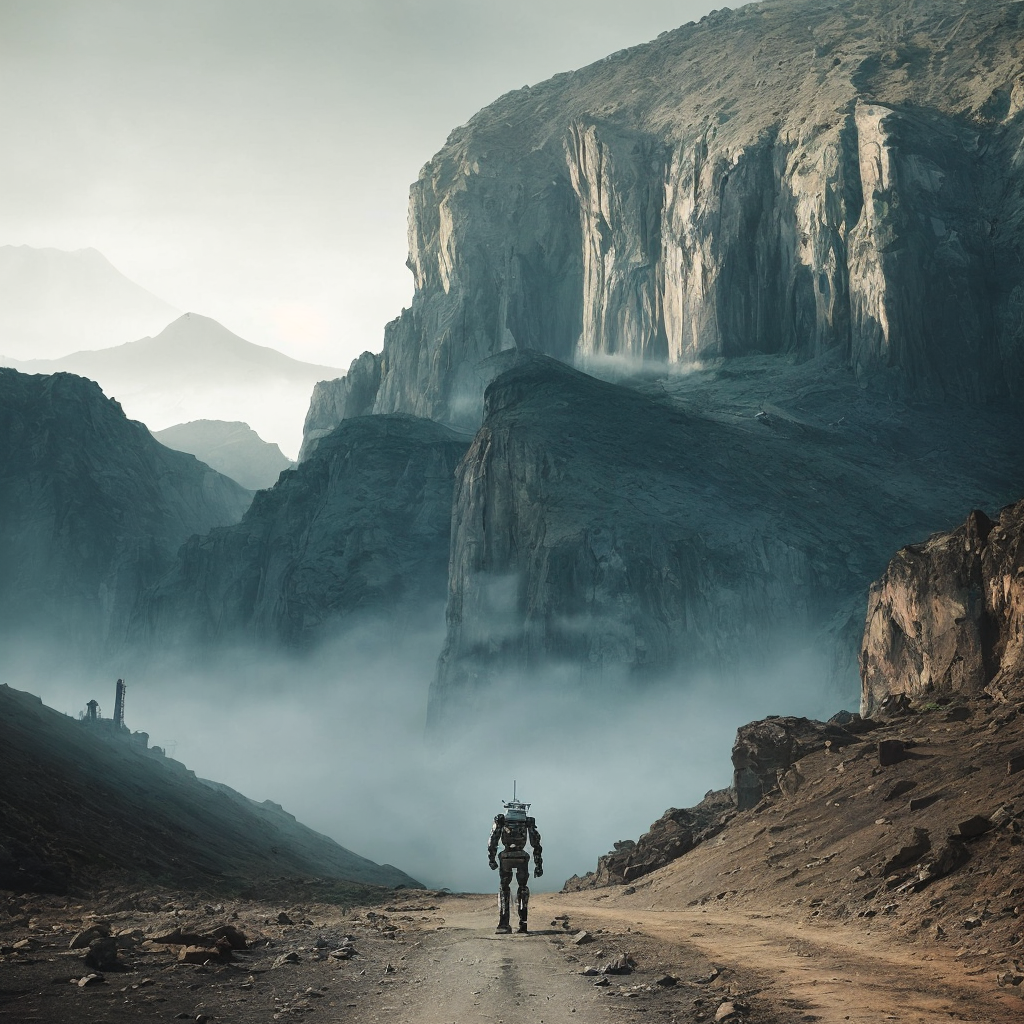
Lonely robots walking away into a cataclysmic valley part 1.
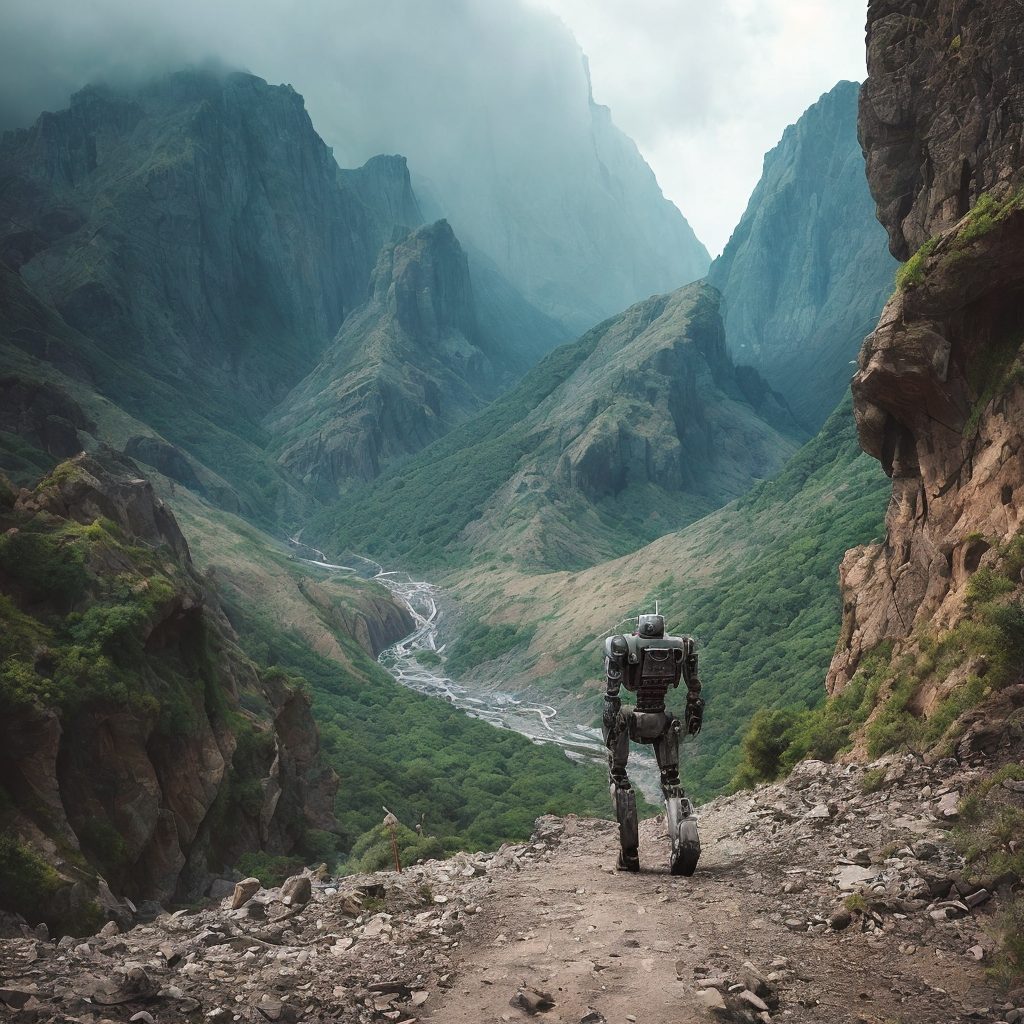
Lonely robots walking away into a cataclysmic valley part 2.
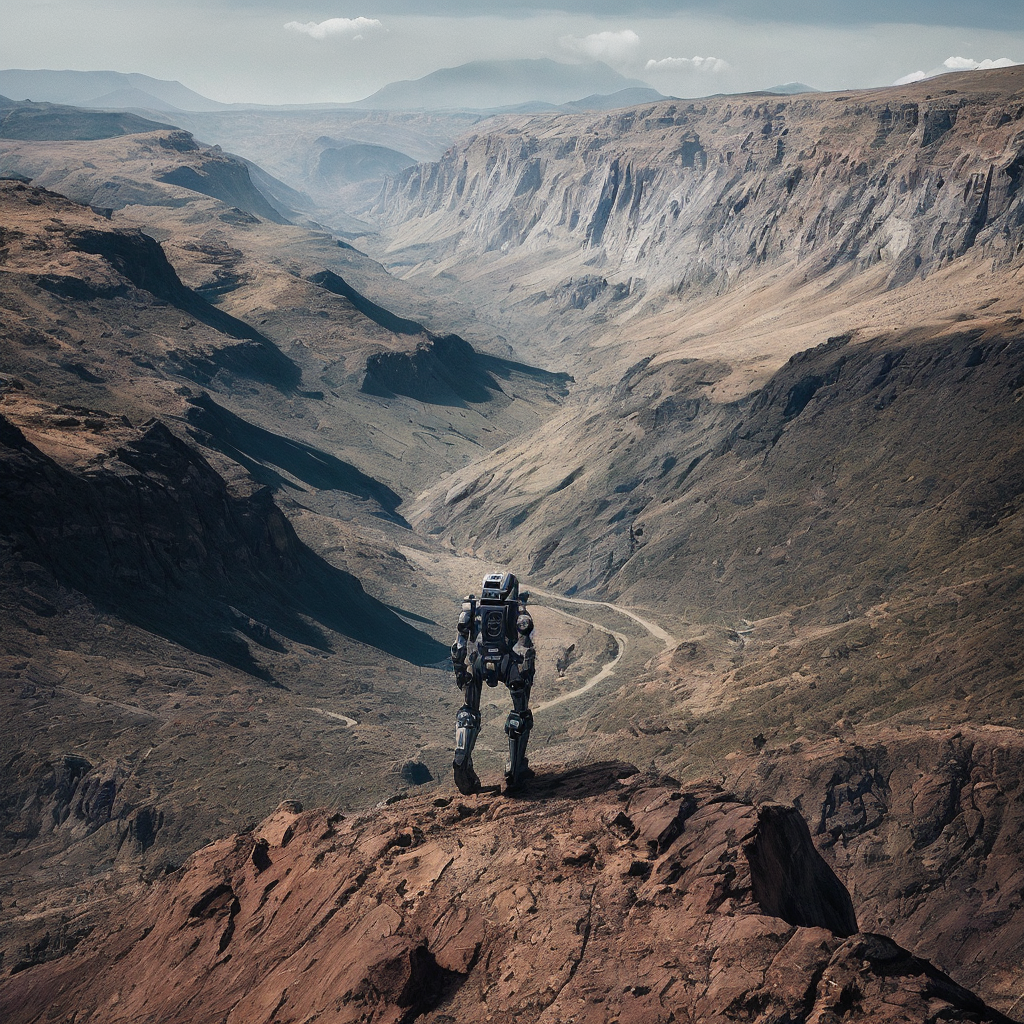
Lonely robots walking away into a cataclysmic valley part 3.
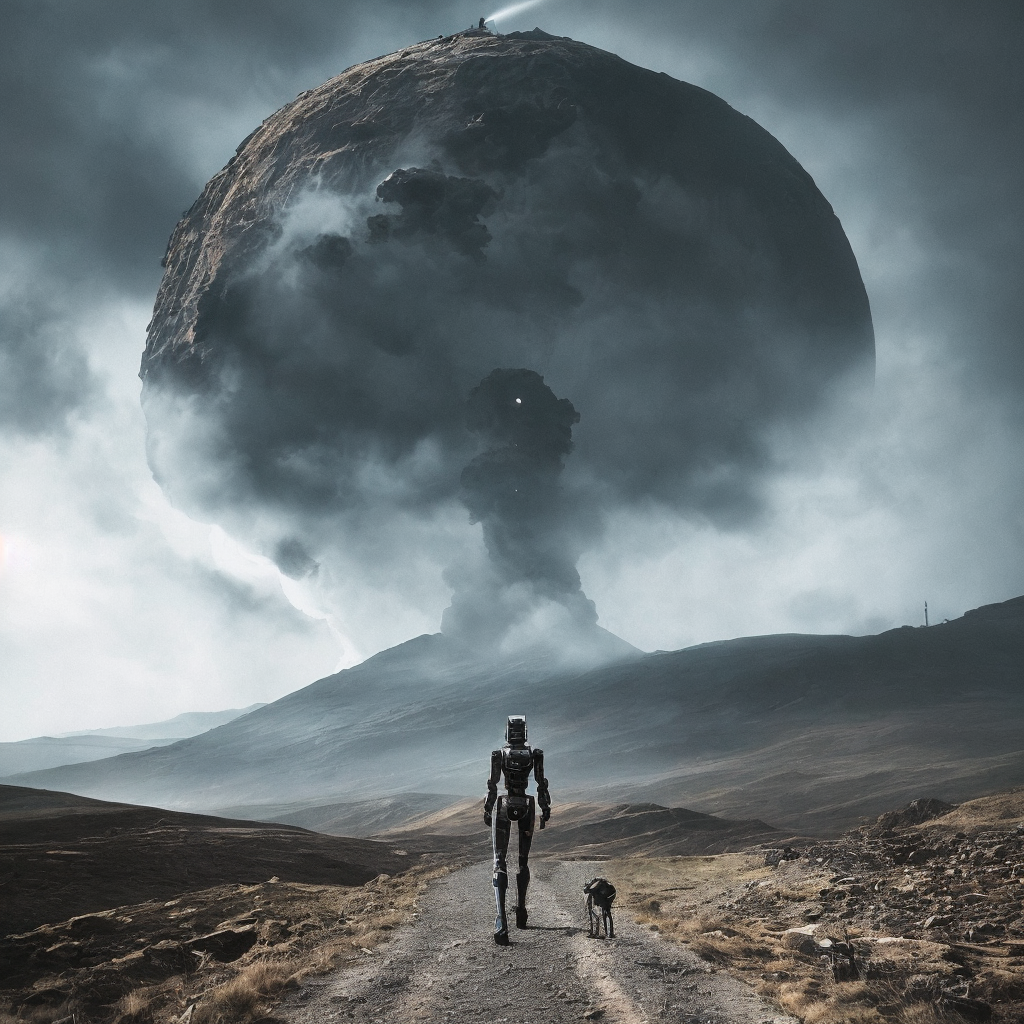
Lonely robots walking away into a cataclysmic valley part 4.
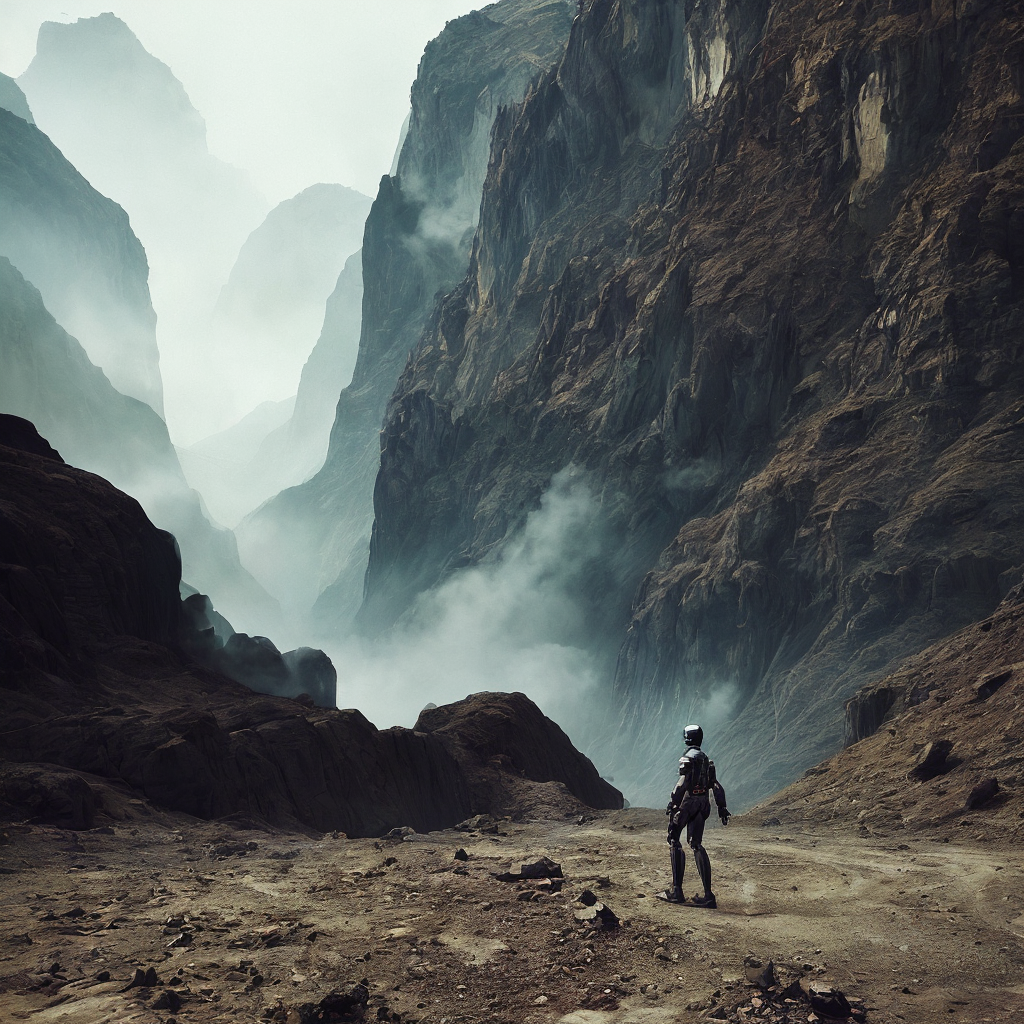
Lonely robots walking away into a cataclysmic valley part 5.
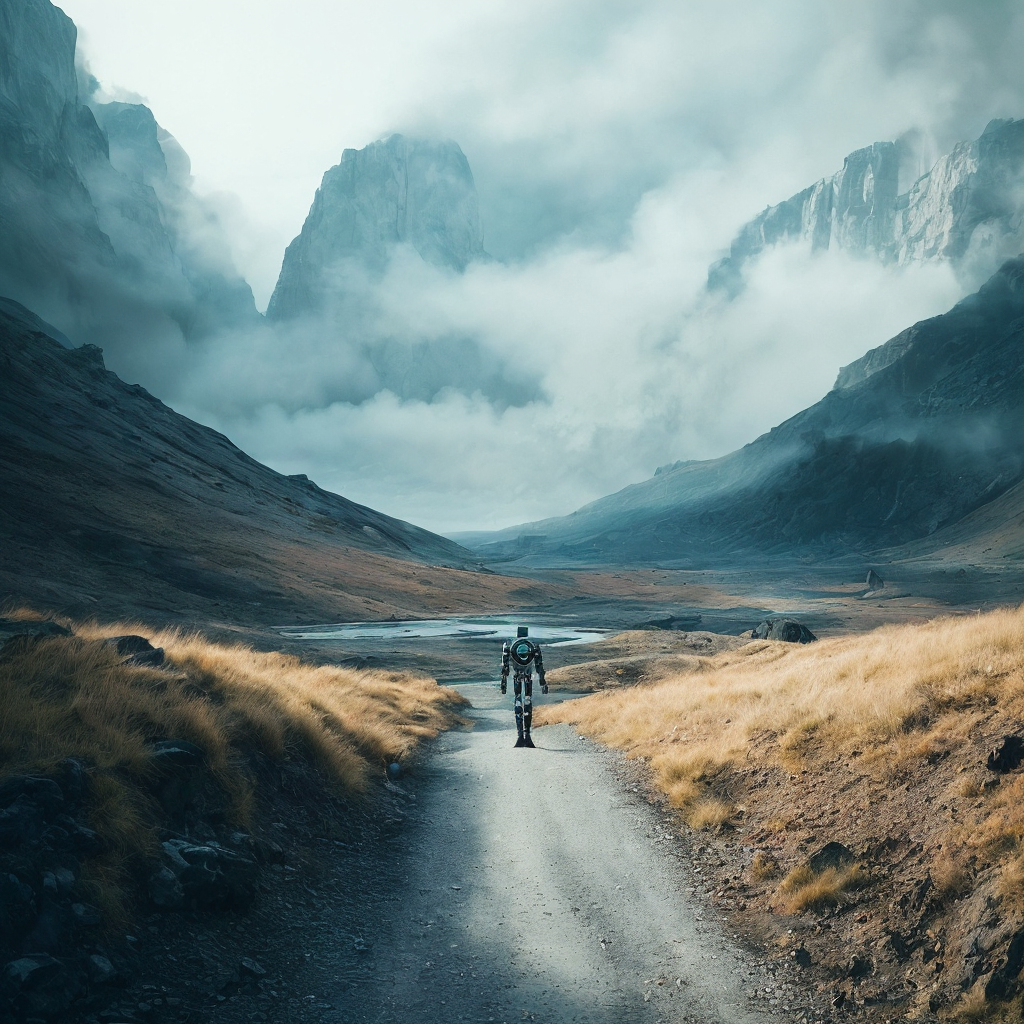
Lonely robots walking away into a cataclysmic valley part 6.
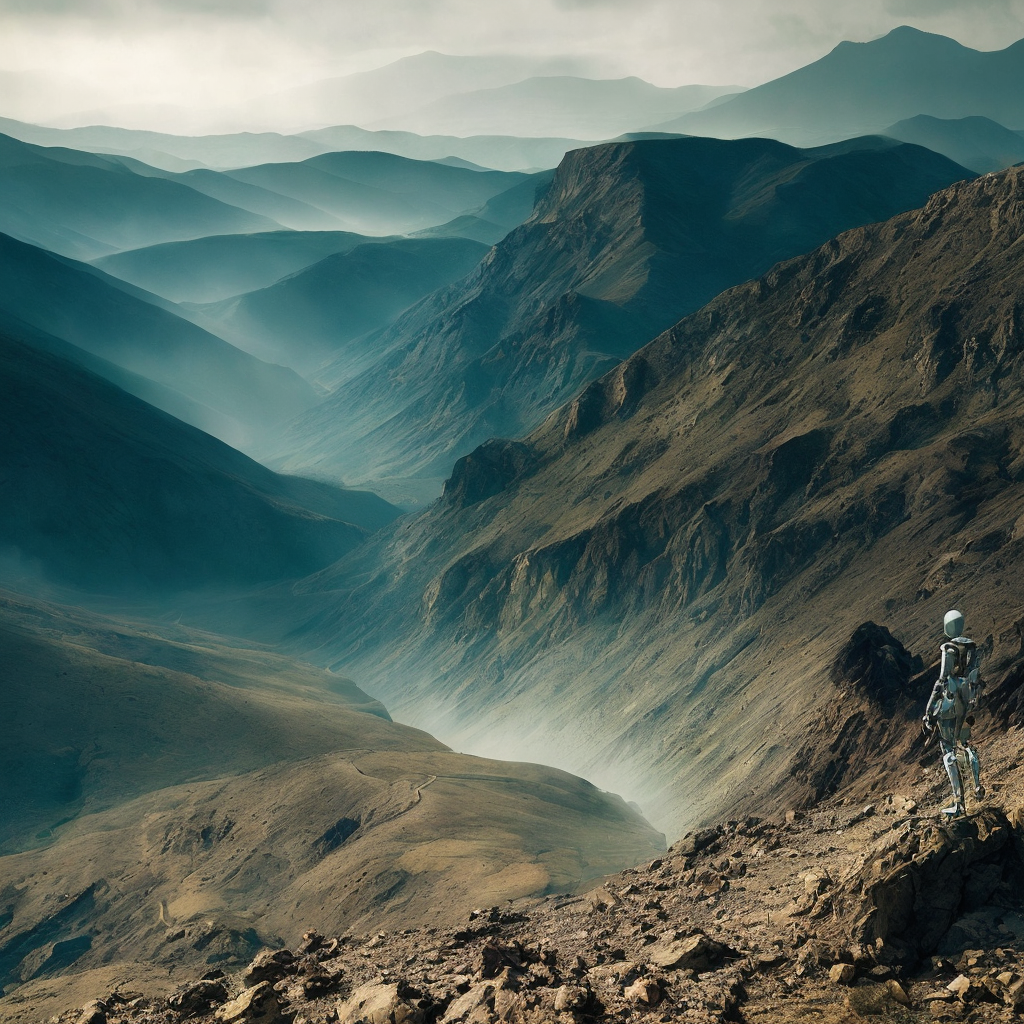
Lonely robots walking away into a cataclysmic valley part 7.
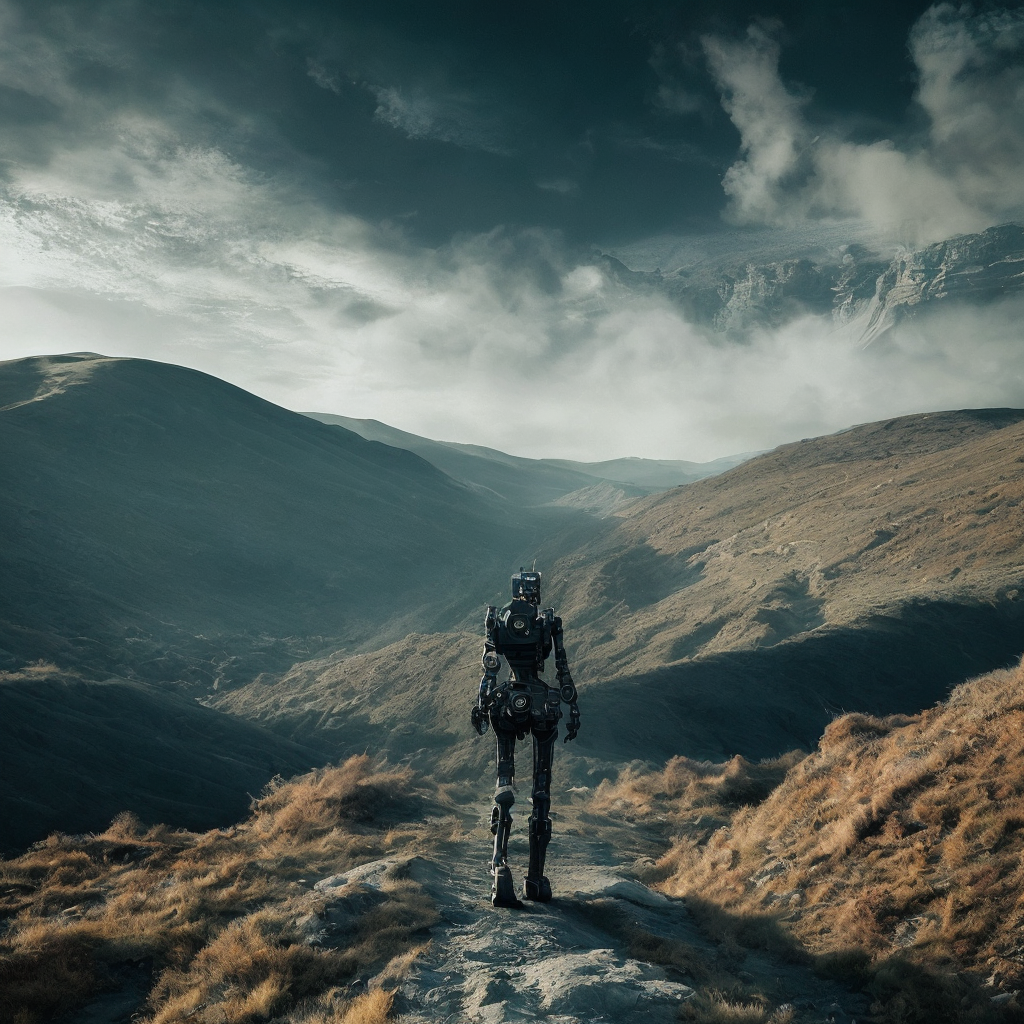
Lonely robots walking away into a cataclysmic valley part 8.
If you found this article useful, consider sharing it in your social circles or bookmarking this page as I have lots more stable-diffusion content in the works…